You know those days, right? When you’re running around like a crazy person, your stomach is rumbling louder than the traffic outside, and you desperately need something that tastes amazing but won’t crash your energy in twenty minutes? That’s exactly why I developed this recipe. Friends, these No Bake Cacao Date Loaded Energy Bars are my absolute lifeline. I’ve been tweaking this simple, perfect formula for ages—literally years—to get the texture just right. It’s the easiest thing you’ll ever make. You toss everything in the food processor, press it down, and suddenly you have portable, rich, chocolatey snacks. Seriously, no oven required! It’s the simple, whole-food fuel I rely on every single week.
Why You Will Love These No Bake Cacao Date Loaded Energy Bars
I’m telling you, you need these in your life RIGHT NOW. Since I started making these, my afternoon slump has basically disappeared. Building reader confidence in a no-bake recipe is huge, and trust me, this one delivers every single time. It’s basically nature’s candy disguised as a super-fuel bar!

- They take less time than brewing a pot of coffee! You just dump and blend. If you’re looking for other fast grab-and-go snacks, definitely check out my recipe for trail mix granola bars because speed is key.
- No oven means no heating up the kitchen, which in the summer is a non-negotiable win for me.
- The flavor is deep and satisfying because the cacao hits just right against the natural sweetness.
Quick Prep Time
We are talking fifteen minutes, tops, of active work time. That’s it! You have time to unload the dishwasher and maybe pour yourself a drink before they go into the fridge. The actual “cooking” is just chilling, which I appreciate because I’m impatient!
Naturally Sweetened No Bake Cacao Date Loaded Energy Bars
This is my favorite part, honestly. You are getting all your sweetness from those gorgeous Medjool dates, which bring fantastic binding power too! We skip all the refined white stuff here. These No Bake Cacao Date Loaded Energy Bars are proof that you don’t need junk to make something taste like a decadent treat.
Perfect for Meal Prep
Prep them on Sunday evening, and you’ve got snacks sorted for the entire busy week ahead. They hold their shape beautifully. I just stack them neatly in a container in the fridge, sealed tight. If you’re organized like that, these are your new best friend.
Essential Ingredients for Your No Bake Cacao Date Loaded Energy Bars
Okay, let’s talk about what goes into these magic bars. Since we aren’t using any heat, the quality of your raw ingredients really shines through, so don’t skimp here! You’re going to need about a cup of pitted Medjool dates. I can’t stress this enough: they HAVE to be soft Medjool. If they are hard, they just won’t blend into that satisfying, sticky dough we are aiming for. If yours are a little stiff, just microwave them for about 15 seconds—trust me on that one!
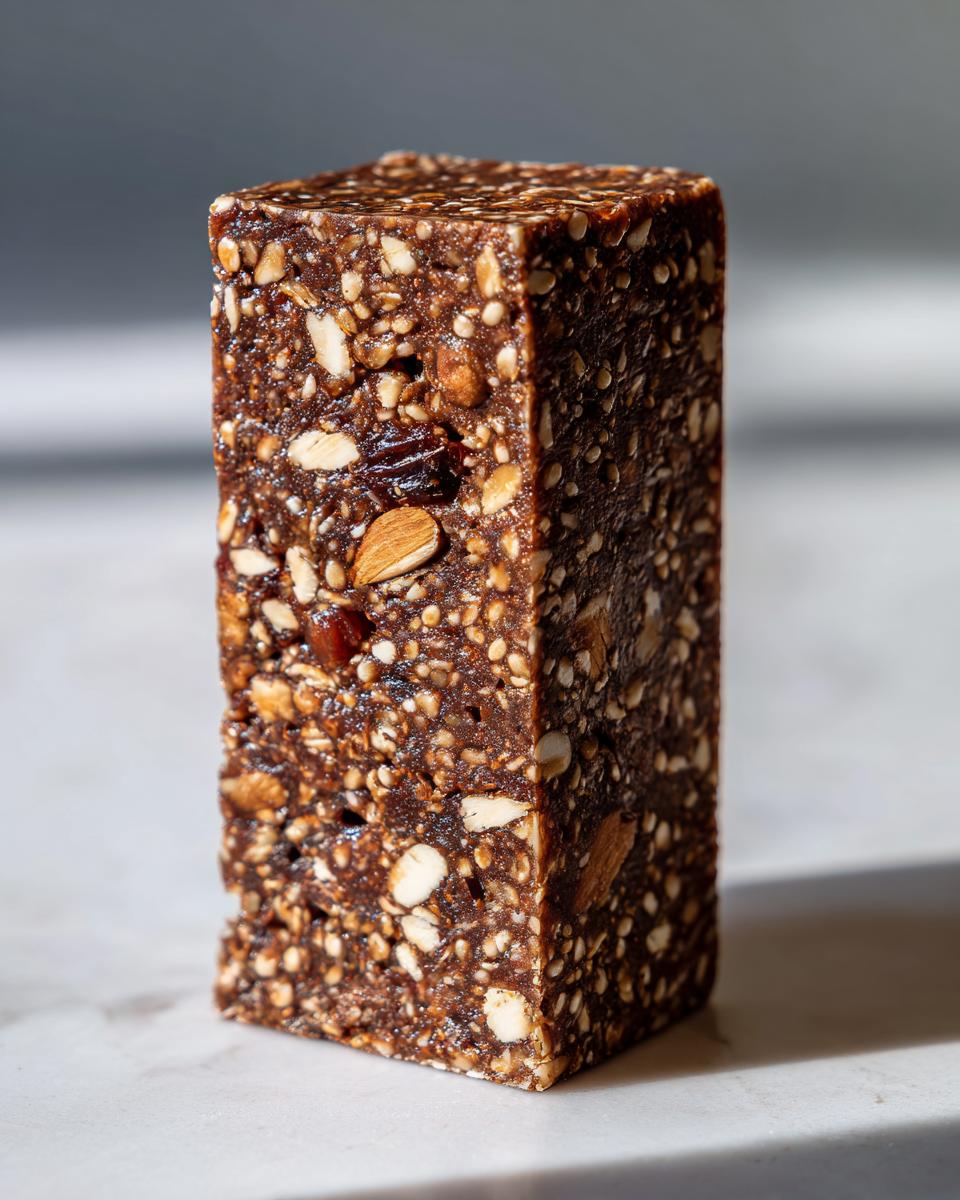
Next up is a cup of rolled oats. Please use the old-fashioned rolled type (like Quaker!), not the quick-cooking kind. The quick oats turn into total mush, and we want some texture in these bars. Then toss in half a cup of raw almonds. These provide the necessary crunch and healthy fat that keeps you full. For that deep chocolate hit, we use a generous quarter cup of unsweetened cacao powder—this is different from cocoa powder, as it’s richer and less processed. Don’t forget two tablespoons of chia seeds, which are brilliant binders and boost the nutritional profile of these great oat-based snacks.
Finally, we need just a splash of melted coconut oil—that helps everything stick together nicely when cold—and a quarter teaspoon of sea salt. The salt is important! It cuts through all that natural sweetness from the dates and really makes the cacao pop. That’s it! One cup of dates, one cup of oats, half a cup of almonds, the rest are flavor boosters and binders. See? So simple!
Ingredient Notes and Substitutions for No Bake Cacao Date Loaded Energy Bars
I get asked this all the time about my No Bake Cacao Date Loaded Energy Bars. If you have a nut allergy, you can absolutely switch out the raw almonds for raw walnuts—they blend just as well and have wonderful flavor too! Or, if you need to keep these completely nut-free, try using raw pumpkin seeds or shelled sunflower seeds instead, though you might need one extra date to help the moisture level.
Remember that date quality check I mentioned? You need those dates to be sticky and pliable so that when they hit the food processor, they turn into paste. If you are using pitted dates that came in a bag and feel rock hard, soak them in hot water for about ten minutes, drain them really well, and then try pulsing them first before adding the oats and almonds. It makes all the difference in achieving that perfect, sticky dough for your No Bake Cacao Date Loaded Energy Bars.
Step-by-Step Instructions for Perfect No Bake Cacao Date Loaded Energy Bars
This is where the magic happens, and honestly, it’s hardly even ‘cooking’! Since these are our No Bake Cacao Date Loaded Energy Bars, the key is getting the right texture in the food processor—it should look like thick, dark, rich cookie dough after everything is blended. Don’t worry if you’ve never used a processor much; I’ll walk you through exactly what to look for so you don’t end up with paste or chunks.
First, line that 8×8 inch pan. I always use parchment paper and leave long ‘handles’ sticking up over the edges. That overhang is your best friend later when you need to lift the entire slab out cleanly. Trust me, trying to scrape hardened bars out of a pan is never fun! If you’ve mastered taking things out of chilled pans before, you’ll be fine, but if you need a refresher on handling baked goods coming out of pans, sometimes looking at techniques for no-bake desserts can give you a good visual guide.
Processing the No Bake Cacao Date Loaded Energy Bars Mixture
Okay, get all those good ingredients—the dates, oats, almonds, cacao, chia, coconut oil, and salt—right into the bowl of your food processor. Now, this is crucial, so listen up: you need to process it in bursts. Don’t just turn it on high and walk away!
Start pulsing. You’ll see the mixture break down; the dates will start sticking to the nuts and oats. You absolutely must stop the machine every 30 seconds or so and use a rubber spatula to scrape down the sides. We need everything to incorporate evenly, especially the oily dates and the drying cacao powder.
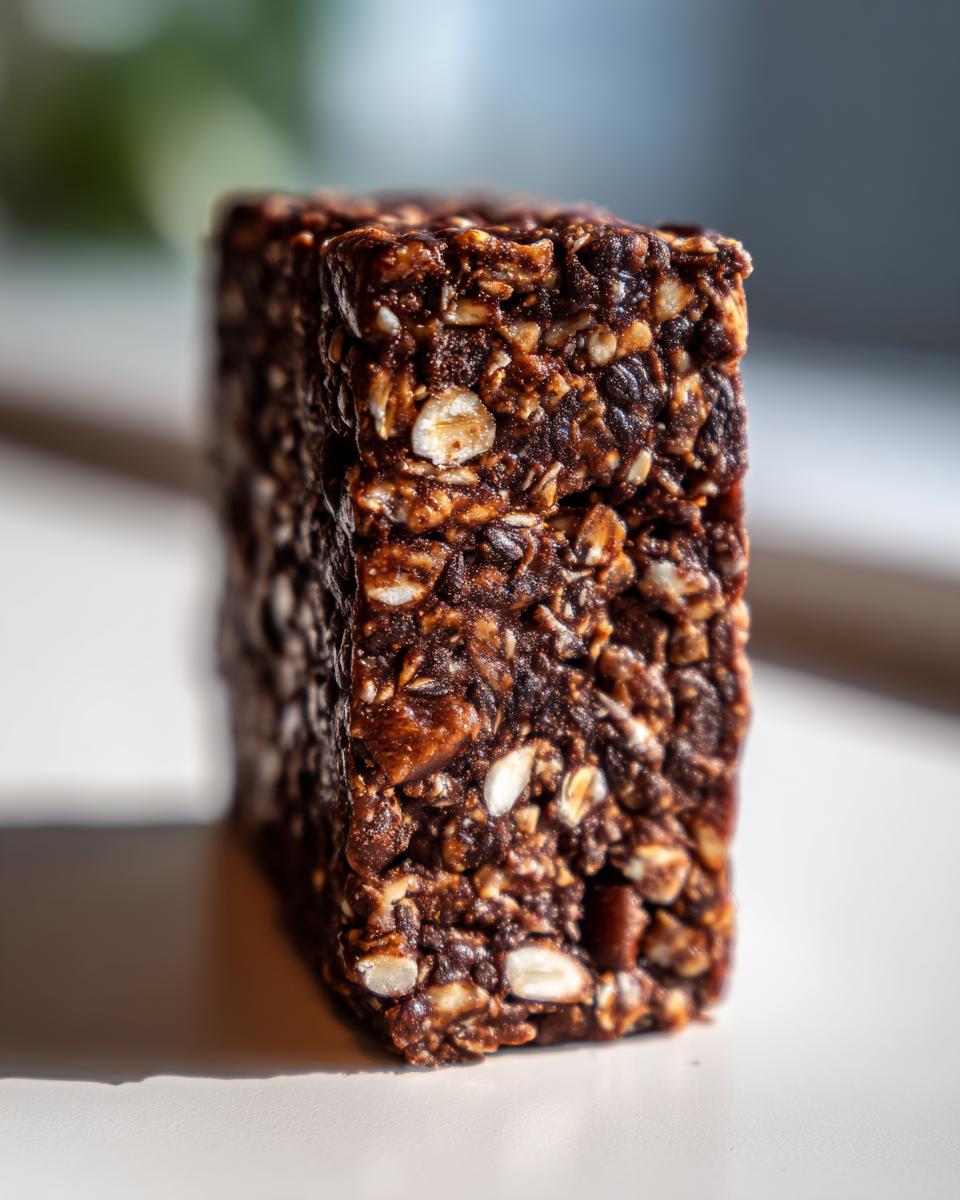
Keep pulsing and scraping until you reach that perfect point. What does that look like? It should look like a really dense, slightly oily dough that just clings together when you pinch a little bit between your fingers. If you try to press it and it immediately crumbles apart, it’s too dry. If it looks greasy or wet, you’ve gone too far! Aim for that sticky, uniform dough—it should hold its shape on the spatula—to guarantee the best No Bake Cacao Date Loaded Energy Bars.
Pressing and Chilling the No Bake Cacao Date Loaded Energy Bars Slab
Once you have that perfect dough, drop it all into your parchment-lined pan. Now for the hard part: you have to press it down *firmly*. I use the flat bottom of a metal spatula or just my clean hands (make sure your hands are slightly damp so the mixture doesn’t stick to you!). You want this slab compacted tightly into the corners evenly across the whole pan.
Tuck those parchment handles in neatly on the sides. Then, off they go into the refrigerator. You need at least two hours here, but honestly, if you can wait three, the bars will be even firmer and cleaner to cut. You can’t rush the chill time if you want those perfect, clean slices later on. If you are dying to try one right away, you can stick it in the freezer for 45 minutes instead, but the texture is best straight from the fridge!
Expert Tips for Making the Best No Bake Cacao Date Loaded Energy Bars
Look, following the recipe is great, but knowing the little tricks I’ve picked up over the years? That’s what separates a good snack from the amazing No Bake Cacao Date Loaded Energy Bars you deserve. I’ve ruined batches by rushing, so let me save you the trouble!
First, let’s talk about pressing the mixture into the pan. If you are struggling with stickiness even when using damp hands, try this trick: place a second piece of parchment paper directly on top of the dough once it’s in the pan. Then, use a flat measuring cup—a dry one!—to press down evenly. It gives you this gorgeous, perfectly flat surface, and absolutely none of the dough sticks to your hands or tools. It’s a game-changer for keeping those edges sharp.
What if your dates were just a little too dry, and when you processed everything, it ended up looking more like coarse dirt than dough? Don’t throw it out! This happened last month, and I was in a panic. Instead of adding more oil, which can make it greasy, try adding water one teaspoon at a time while the processor is running *on low*. Seriously, just a teaspoon, wait five seconds, check it. Often, a touch of water is all you need to wake up those dates and get them binding again. It’s magic how little liquid can change the whole texture of these No Bake Cacao Date Loaded Energy Bars.
Another thing to watch for is the quality of your cacao. Because we are not baking, the flavor of the cacao powder is front and center. If you use a cheap, dusty one, your bars will taste dusty. I only use high-quality 100% cacao powder; the slight bitterness it brings balances the intense sweetness of the Medjools perfectly. It’s the difference between a snack I tolerate and a snack I crave constantly. If you are looking for tips on balancing big flavors, even though this isn’t a meatball recipe, the principles of balancing richness apply, just like in my guide on ultimate meatball recipe—you need that counterpoint!
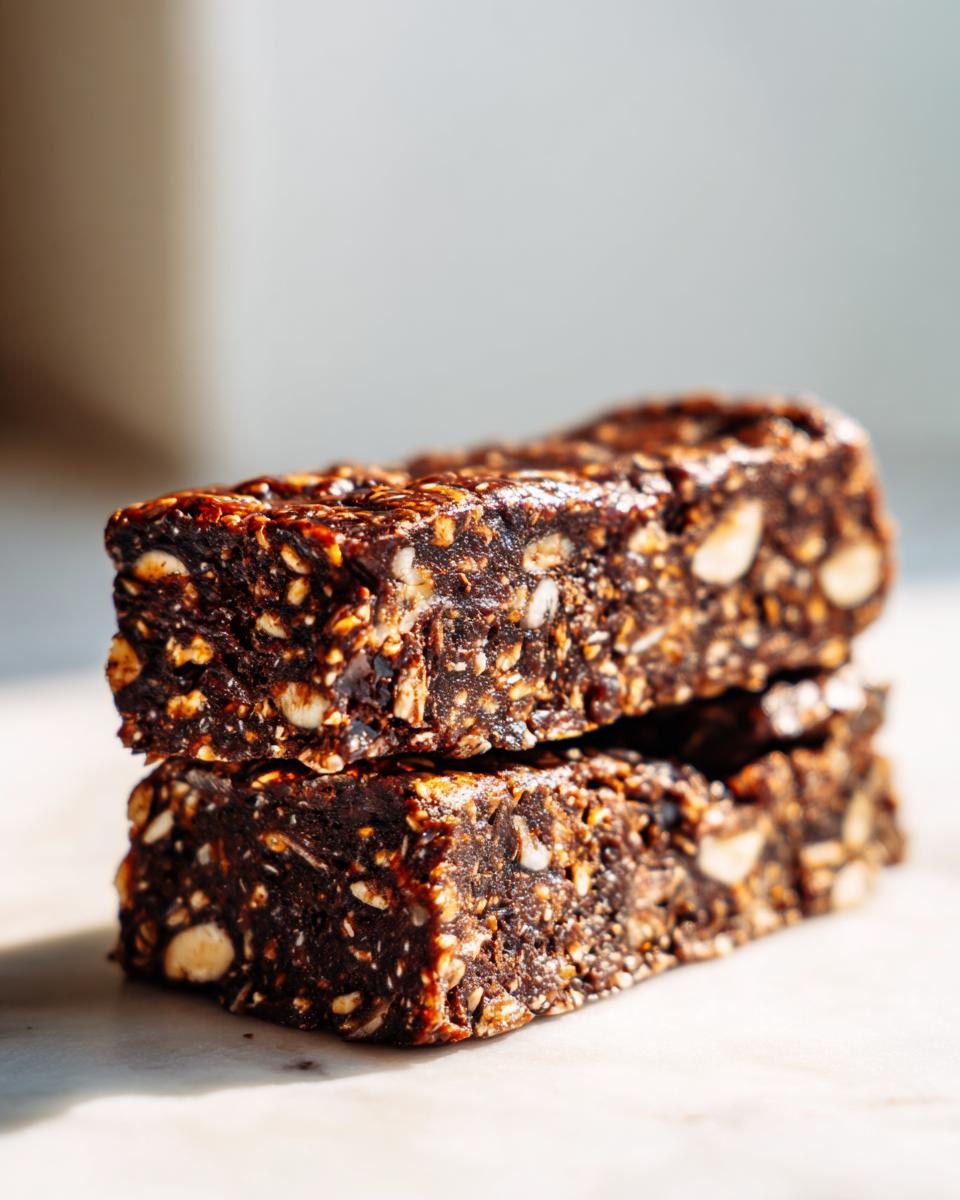
Finally, when you cut the bars after chilling, take the entire slab out onto your cutting board using the parchment handles. Let it sit on the counter for about five minutes—just five!—before cutting. If you try to cut it stone cold from the fridge, the hard almonds inside can sometimes cause the bar to crack when the knife hits them. Letting it warm just slightly softens the whole structure, giving you those beautiful, clean cuts every single time for your finished No Bake Cacao Date Loaded Energy Bars.
Storage and Make-Ahead for Your No Bake Cacao Date Loaded Energy Bars
This is the best part about making a batch of these No Bake Cacao Date Loaded Energy Bars: they are the ultimate make-ahead snack. You don’t have to worry about them going stale because they are actually better the next day once they’ve really firmed up in the cold!
For general storage, you want an airtight container. I usually use one of those glass Pyrex containers because they keep things so fresh. Stored correctly in the refrigerator, these bars will stay perfectly delicious for up to two weeks. Seriously, two weeks! They are so dense with whole ingredients that they hold up fantastically.
If you are like me and you like to have snacks ready for months at a time, you can absolutely freeze these. Just make sure you wrap them individually first. I use small squares of parchment or wax paper between each bar before stacking them in a sturdy freezer bag or container. Freezing keeps the moisture locked in beautifully, and they thaw out in about 20 minutes on the counter, or you can eat them semi-frozen if you like them extra crunchy!
When I make a double batch, I keep one container in the fridge for my weekday grab-and-go fuel, and the other goes straight into the freezer. It’s a lifesaver when you realize you forgot to prep snacks for the week, because you just pull out a frosty batch! If you are ever wondering about keeping other dairy-based things fresh longer, like how to thicken milk into heavy cream at home, remember that airtight sealing and low temperatures are your very best friends for extending shelf life!
These robust No Bake Cacao Date Loaded Energy Bars really are built to last, making them perfect for tossing into lunch boxes or emergency supply bags. Just remember, the colder they are, the easier they are to cut cleanly if you happen to slice them while they are still slightly soft.
Serving Suggestions for No Bake Cacao Date Loaded Energy Bars
Now that you have these incredible No Bake Cacao Date Loaded Energy Bars, how should you eat them? Well, honestly, you can just grab one and run, which is what I usually do when I’m rushing out the door to work or heading to the gym. But sometimes, it’s nice to sit down and enjoy the rich chocolatey flavor properly!
These are absolutely perfect before a workout. Because they rely on those complex carbs from the dates and oats, you get sustained energy rather than that sugar rush and crash you get from processed bars. I usually have half a bar about 30 minutes before my evening run, and it gives me just the right fuel without feeling heavy.
For an afternoon pick-me-up, these bars pair really nicely with something slightly tart or creamy to balance out the deep cacao flavor. I love having one alongside a warm mug of herbal tea—something simple like peppermint or ginger. If you’re looking for other fantastic on-the-go breakfast or snack ideas, you should definitely look at my recipe for breakfast cookies on the go! It’s a different texture but hits that same ‘need quick fuel’ spot.
They are also fantastic crumbled up! Pop one of those chilled bars into a small food processor or just crush it really well in a plastic bag. You can use those crumbs instead of granola on top of a small yogurt bowl (if you eat dairy) or layered with some fresh berries. It gives you that intense chocolate flavor with a little more texture contrast.
Seriously, these No Bake Cacao Date Loaded Energy Bars travel incredibly well. Pack one in your work bag, your kid’s lunch, or even toss one into your hiking pack. They are sturdy, delicious, and provide exactly the whole-food boost you need without any fuss!
Frequently Asked Questions About No Bake Cacao Date Loaded Energy Bars
I always get so many questions once people try these, which usually means they are already planning their next batch! It’s the best kind of problem to have. Since these No Bake Cacao Date Loaded Energy Bars are so customizable, I wanted to clear up a few things readers often ask me about texture and swaps.
You know, I try to remind everyone that since we aren’t baking, the texture totally relies on the stickiness of those dates, so sometimes people get worried if they are new to date-based snacks. Don’t worry your head about it; we can usually fix any consistency issue right in the processor!
Can I make these No Bake Cacao Date Loaded Energy Bars nut-free?
That’s a fair question, especially if you are bringing these delicious No Bake Cacao Date Loaded Energy Bars into an environment where allergies are a concern. The basic recipe notes suggest swapping almonds for walnuts because the fat content blends similarly. HOWEVER, if you need to go fully nut-free (no almonds AND no walnuts), my best advice is to substitute the 1/2 cup of almonds with 1/2 cup of raw sunflower seeds or raw pumpkin seeds. You might need to add just a touch more melted coconut oil—maybe an extra teaspoon—to help everything bind, but they will still come out fantastic!
My mixture is too dry, what can I add to fix my vegan energy bars?
Ah, the dreaded dry mixture! This usually happens if your Medjool dates weren’t quite soft enough or if your cacao powder was exceptionally dry. If you’ve stopped pulsing and it looks crumbly, stop adding dry ingredients immediately! You need moisture.
First, try pulsing in just one teaspoon of cold water. Wait a minute and see if the mixture starts clinging together again. If it’s still just a little too crumbly after that, try adding half a teaspoon of extra melted coconut oil instead. That fat is brilliant at helping the mixture grab onto itself. Just remember, add liquid *slowly* when trying to fix dry **vegan energy bars**!
It’s always easier to deal with a slightly sticky mixture when making these No Bake Cacao Date Loaded Energy Bars than one that turns into powder. If you are looking for more general tips on staying hydrated while snacking on things like this, remember to drink enough water throughout your busy day, which is something I talk about often, like in my post on how to drink 8 glasses of water each day!
Overall, these simple swaps ensure everyone can enjoy our favorite chocolate date snack. Let me know if you have any other questions below!
Estimated Nutritional Profile of No Bake Cacao Date Loaded Energy Bars
I always like to give you an idea of what you’re fueling up with when you make these No Bake Cacao Date Loaded Energy Bars! Because we are using real, whole ingredients like dates and oats, the exact numbers can shift slightly depending on the brand of cacao or how sweet your dates naturally are, but this gives you a really solid baseline. This is based on dividing the whole batch into 10 equal bars.
These nutritional estimates are based on standard ingredient quantities, so remember that every batch you make at home is going to have minor variations. But hey, the good news is that we are getting fantastic natural energy from the carbs and a decent boost of fiber and protein to keep you satisfied between meals!
- Serving Size: 1 bar
- Calories: Around 220 per bar
- Total Fat: About 9 grams (and most of that is the great unsaturated fat from the almonds!)
- Saturated Fat: A low 2 grams
- Carbohydrates: 35 grams, mostly fueling energy!
- Fiber: A solid 5 grams, helping keep things moving!
- Protein: A nice 5 grams to balance out the sweetness
- Sugar: 18 grams, but remember, this is all naturally occurring from the dates!
- Cholesterol: Zero, thankfully!
See? It’s a great profile for a quick energy boost. You’re getting the good fats, fiber, and sustained energy from carbs, all without any weird fillers or refined sugars you find in store-bought bars. Enjoy them guilt-free because these No Bake Cacao Date Loaded Energy Bars really are packed full of good stuff!
Share Your No Bake Cacao Date Loaded Energy Bars Creations
Alright, that’s the whole process! I’ve given you all my secrets on how to whip up the most amazing, deeply satisfying No Bake Cacao Date Loaded Energy Bars in under 20 minutes of active time. Now, the part I love the most: hearing from you!
When you make these, I really, really want to know what you think. Did you use walnuts instead of almonds? Did you add a pinch of cayenne for a little kick when you made your No Bake Cacao Date Loaded Energy Bars? Drop a comment down below, rate the recipe five stars if you loved it, and tell the world how easy this was!
And please, please, please share your creations! Snap a photo of your neatly sliced bars or even one you’re grabbing on the way out the door, and tag me on social media. Seeing your feedback makes all the testing and tasting worth it. It’s what connects us all in the kitchen. If you have any super specific questions that I didn’t cover, don’t hesitate to use my contact form over at the contact page. I’m always happy to troubleshoot for you!
Go forth and snack smarter! Enjoy those rich, chocolatey, no-bake goodies!
Print
No Bake Cacao Date Loaded Energy Bars
- Total Time: 2 hr 15 min
- Yield: 10 servings 1x
- Diet: Vegan
Description
Simple, no-bake energy bars made with cacao and dates.
Ingredients
- 1 cup pitted Medjool dates
- 1 cup rolled oats
- 1/2 cup raw almonds
- 1/4 cup unsweetened cacao powder
- 2 tablespoons chia seeds
- 1 tablespoon coconut oil, melted
- 1/4 teaspoon sea salt
Instructions
- Place the dates, oats, almonds, cacao powder, chia seeds, coconut oil, and salt into a food processor.
- Process the mixture until it forms a sticky, uniform dough. Stop and scrape down the sides as needed.
- Line an 8×8 inch baking pan with parchment paper, leaving an overhang on the sides.
- Press the dough evenly into the prepared pan. Use the back of a spatula or your fingers to compact it firmly.
- Refrigerate the bars for at least 2 hours, or until firm.
- Lift the bars out of the pan using the parchment paper overhang.
- Cut the slab into 10 equal bars.
Notes
- Store the finished bars in an airtight container in the refrigerator for up to two weeks.
- You can substitute walnuts for almonds if desired.
- Prep Time: 15 min
- Cook Time: 0 min
- Category: Snack
- Method: No Bake
- Cuisine: American
Nutrition
- Serving Size: 1 bar
- Calories: 220
- Sugar: 18
- Sodium: 45
- Fat: 9
- Saturated Fat: 2
- Unsaturated Fat: 7
- Trans Fat: 0
- Carbohydrates: 35
- Fiber: 5
- Protein: 5
- Cholesterol: 0
Keywords: no bake, energy bars, cacao, dates, oats, almonds, vegan snack, quick energy