Oh, do I have a treat for you! This upside-down apple tart is my go-to when I want something impressive but secretly easy. Picture this: caramelized apples with that perfect hint of cinnamon, all snuggled under a buttery, flaky crust. The magic happens when you flip it—those glossy, golden apples become the star of the show. It’s the kind of dessert that makes everyone think you slaved away, but trust me, it’s simpler than it looks. Just a few basic ingredients and a skillet are all you need to create this cozy, French-inspired masterpiece. Let’s get baking!
Why You’ll Love This Upside-Down Apple Tart
Let me count the ways this tart will steal your heart (and probably your dessert plate):
- Foolproof elegance – It looks fancy but comes together with just a skillet and basic pantry staples
- That caramel magic – The apples cook in buttery cinnamon sugar until they’re sticky-sweet perfection
- Flaky, buttery crust – So tender it practically melts against the warm apples
- Dramatic reveal – Nothing beats that gasp when you flip it onto the plate!
- Weeknight easy – From peel to plate in under an hour, perfect for unexpected guests
Seriously, once you see how those caramelized apples glisten under the crust, you’ll make excuses to bake this weekly.
Ingredients for Upside-Down Apple Tart
Grab these simple ingredients – I bet you have most in your kitchen right now! The key here is quality: real butter, fresh apples, and properly measured flour make all the difference.
- 4 medium apples (peeled and sliced 1/4-inch thick – Granny Smith work best)
- 1/2 cup packed brown sugar (dark gives the deepest caramel flavor)
- 1/4 cup unsalted butter (for the caramel – no substitutes!)
- 1 tsp cinnamon (or more if you’re feeling cozy)
- 1 1/2 cups all-purpose flour (spooned and leveled)
- 1/4 tsp salt (just a pinch to balance the sweetness)
- 1/2 cup cold unsalted butter (cubed – I pop mine in the freezer for 10 minutes first)
- 3-4 tbsp ice water (literally ice cubes floating in it – keeps the crust flaky)
See? Nothing fancy – just good, honest ingredients that transform into something magical. Now let’s make some magic!
How to Make Upside-Down Apple Tart
Ready for the fun part? Let’s turn those simple ingredients into a showstopper. I’ll walk you through each step – from that glorious caramel sizzle to the big reveal when you flip it out of the pan. Just follow along, and you’ll have a golden-brown beauty in no time!
Preparing the Caramelized Apples
First, grab your trusty ovenproof skillet (I use my 10-inch cast iron). Melt that 1/4 cup butter over medium heat until it’s frothy, then sprinkle in the sugar and cinnamon. Stir like you mean it for about 2 minutes – you’ll smell that toasty caramel magic starting. Now, carefully arrange your apple slices in concentric circles (or just toss ’em in if you’re feeling casual). Let them bubble away for 5 minutes until they’re slightly softened but still hold their shape. That syrup should be thick enough to coat the back of a spoon – that’s your cue to take it off the heat.
Making the Buttery Crust
While the apples cool a smidge, let’s make the crust. Whisk together flour and salt in a big bowl, then grab those icy butter cubes. Work the butter into the flour with your fingers or a pastry cutter until it looks like coarse crumbs with some pea-sized bits remaining – those butter pockets will make the crust extra flaky. Now, drizzle in the ice water 1 tablespoon at a time, mixing gently with a fork just until the dough comes together when you squeeze it. Don’t overwork it! Form it into a disc, wrap in plastic, and let it rest for 5 minutes while the oven finishes preheating.
Assembling and Baking the Tart
Roll your dough into a rough circle slightly larger than your skillet (no need to be perfect – rustic is charming!). Carefully drape it over the apples, tucking the edges down around the fruit. Pop it in the oven at 375°F and bake for 25-30 minutes until the crust is golden and you see caramel bubbling at the edges. Now, the hardest part: let it cool for exactly 5 minutes (set a timer!) before flipping it onto a plate. Use oven mitts – that caramel is lava-hot! Lift the skillet slowly… and prepare for applause.
Tips for the Perfect Upside-Down Apple Tart
Listen, I’ve flipped my fair share of tarts (and had a few flops!), so here’s my hard-earned wisdom for foolproof success every time:
- Apple choice is key – Granny Smiths hold their shape, but Honeycrisp add sweetness if you like it juicier
- Keep everything cold – Chill your butter cubes and use truly ice-cold water for the flakiest crust
- Patience with the flip – Let it rest 5 minutes (no cheating!) so the caramel sets just enough
- Skillet safety – Run a knife around the edge first so nothing sticks during the big reveal
- Slice thickness matters – 1/4-inch apple slices caramelize perfectly without turning mushy
Follow these, and you’ll get that Instagram-worthy flip every single time. Promise!
Serving Suggestions for Upside-Down Apple Tart
Oh, the possibilities! This tart shines brightest when served warm – that gooey caramel just begs for a scoop of vanilla ice cream melting into all the nooks. Feeling fancy? A dollop of freshly whipped cream and a sprinkle of cinnamon takes it over the top. For breakfast (no judgment here), pair it with a strong cup of coffee and lean into the cozy vibes. Honestly, it’s pretty perfect all on its own too – just follow your heart (and sweet tooth).
Storing and Reheating Upside-Down Apple Tart
If by some miracle you have leftovers (it happens!), here’s how to keep that tart tasting fresh. Let it cool completely, then cover loosely with foil and stash it in the fridge for up to 2 days. When the craving hits, reheat slices in a 300°F oven for 10 minutes – just until the crust crisps back up and the caramel gets all gooey again. Microwave works in a pinch (15-20 seconds), but the crust won’t stay as flaky. Pro tip: The caramel seeps into the apples overnight, making day-two slices even more decadent!
Upside-Down Apple Tart Variations
Once you’ve mastered the classic, try these fun twists! Toss a handful of chopped pecans or walnuts into the caramel for extra crunch. Swap cinnamon for cardamom or a pinch of nutmeg if you’re feeling adventurous. For a boozy kick, splash some bourbon over the apples before adding the crust. My personal favorite? Adding a layer of thinly sliced pears with the apples – the combo is heavenly. The beauty of this tart is how easily it adapts to whatever flavors you’re craving!
Upside-Down Apple Tart Nutritional Information
Now, let’s be real—this is dessert, not health food! But since you asked, here’s the scoop on what you’re biting into. Each slice packs a cozy mix of carbs from those sweet apples and flaky crust, with just enough butter to make it irresistibly rich. The brown sugar caramel adds that deep, toasty sweetness we all crave. And hey, apples mean you’re getting some fiber and vitamins in there too, right? (Wink.)
Remember: Nutritional values are estimates and vary based on ingredients used. If you’re counting specifics, your best bet is plugging your exact brands into a calculator. But honestly? Some things are worth savoring without overthinking—this tart’s pure joy in every forkful.
Frequently Asked Questions
Can I use puff pastry instead of making the crust from scratch?
Absolutely! A store-bought puff pastry sheet works in a pinch – just thaw it first and trim to fit your skillet. It’ll be flakier than the shortcrust version, almost like an apple turnover. That said, I swear by the homemade crust – it’s sturdier for flipping and soaks up all that caramel goodness perfectly.
How do I prevent a soggy bottom crust?
Two tricks: First, make sure your caramel isn’t too runny before adding apples – it should coat the spoon thickly. Second, roll your dough slightly thicker in the center than the edges. The extra layer protects against moisture. And whatever you do, don’t skip that 5-minute cooling period before flipping!
Can I make this tart ahead of time?
You can prep components separately (caramelize apples and make dough up to a day ahead), but bake it fresh for serving. Reheated tarts lose that perfect crust texture. Need to speed things up? Use pre-sliced apples from the grocery store – just pat them dry first.
My tart stuck to the pan! Help?
First, breathe – I’ve been there! Next time, grease your skillet extra well (I rub mine with butter AND a thin layer of vegetable oil). If disaster strikes, scoop the delicious mess into bowls and call it “deconstructed” – tastes just as good! Runny caramel? Let apples cook another minute or two until syrupy.
Try this recipe and share your results! Tag me in your tart-flipping triumphs (or fails – we’ve all been there!).
Print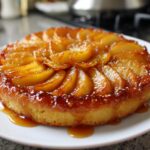
Unbelievably Easy 4-Ingredient Upside-Down Apple Tart
- Total Time: 50 mins
- Yield: 6 servings 1x
- Diet: Vegetarian
Description
A delicious upside-down apple tart with caramelized apples and a buttery crust.
Ingredients
- 4 medium apples, peeled and sliced
- 1/2 cup sugar
- 1/4 cup butter
- 1 tsp cinnamon
- 1 1/2 cups all-purpose flour
- 1/4 tsp salt
- 1/2 cup cold butter, cubed
- 3–4 tbsp ice water
Instructions
- Preheat oven to 375°F (190°C).
- Melt butter in a skillet, add sugar and cinnamon. Stir until caramelized.
- Arrange apple slices in the caramel mixture and cook for 5 minutes.
- In a bowl, mix flour and salt. Cut in butter until crumbly.
- Add ice water gradually until dough forms.
- Roll out dough and place over apples in the skillet.
- Bake for 25-30 minutes until golden.
- Let cool for 5 minutes, then invert onto a serving plate.
Notes
- Use firm apples like Granny Smith for best results.
- Serve warm with vanilla ice cream.
- Store leftovers covered in the fridge for up to 2 days.
- Prep Time: 20 mins
- Cook Time: 30 mins
- Category: Dessert
- Method: Baking
- Cuisine: French
Nutrition
- Serving Size: 1 slice
- Calories: 320
- Sugar: 25g
- Sodium: 150mg
- Fat: 15g
- Saturated Fat: 9g
- Unsaturated Fat: 5g
- Trans Fat: 0g
- Carbohydrates: 45g
- Fiber: 3g
- Protein: 3g
- Cholesterol: 40mg
Keywords: apple tart, upside-down dessert, caramelized apples