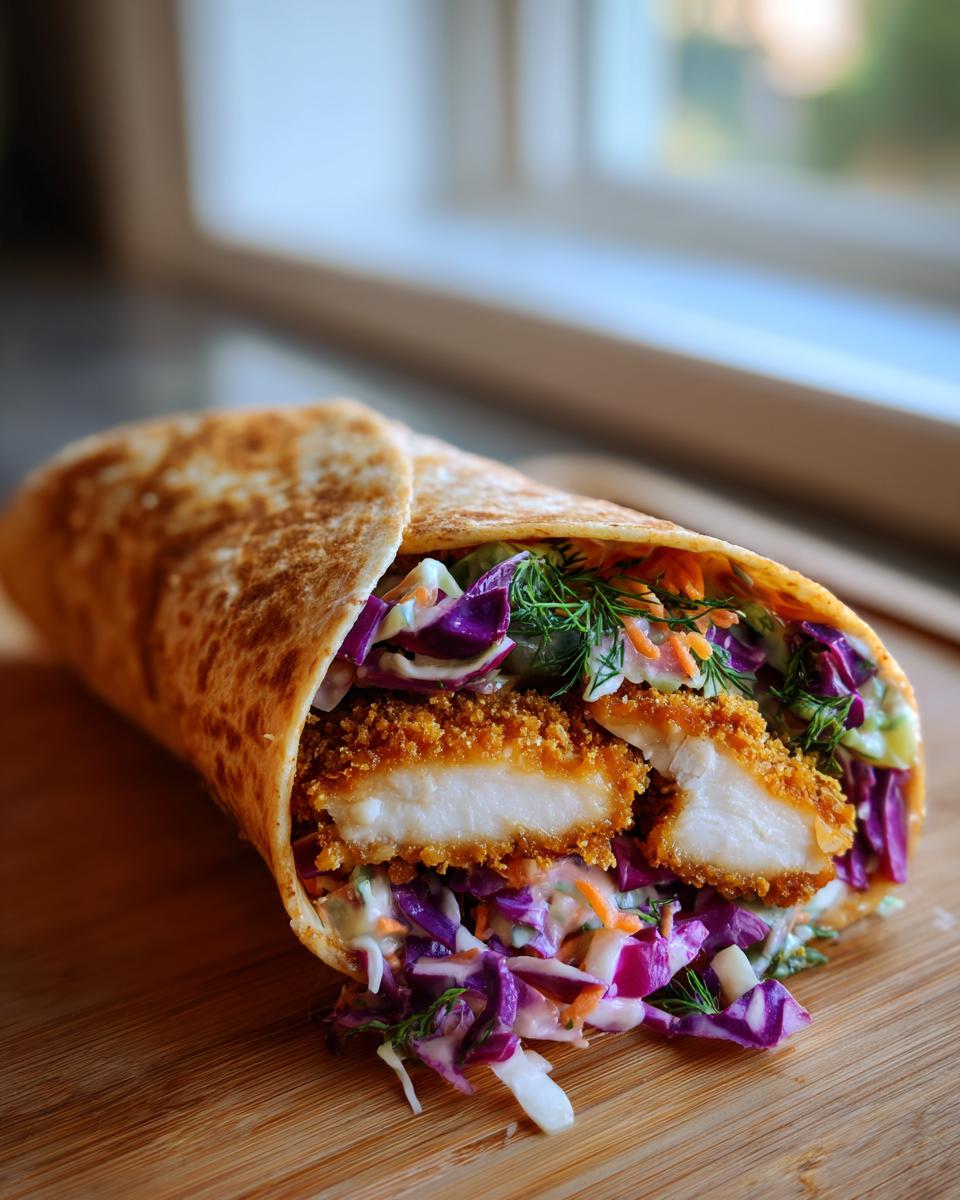
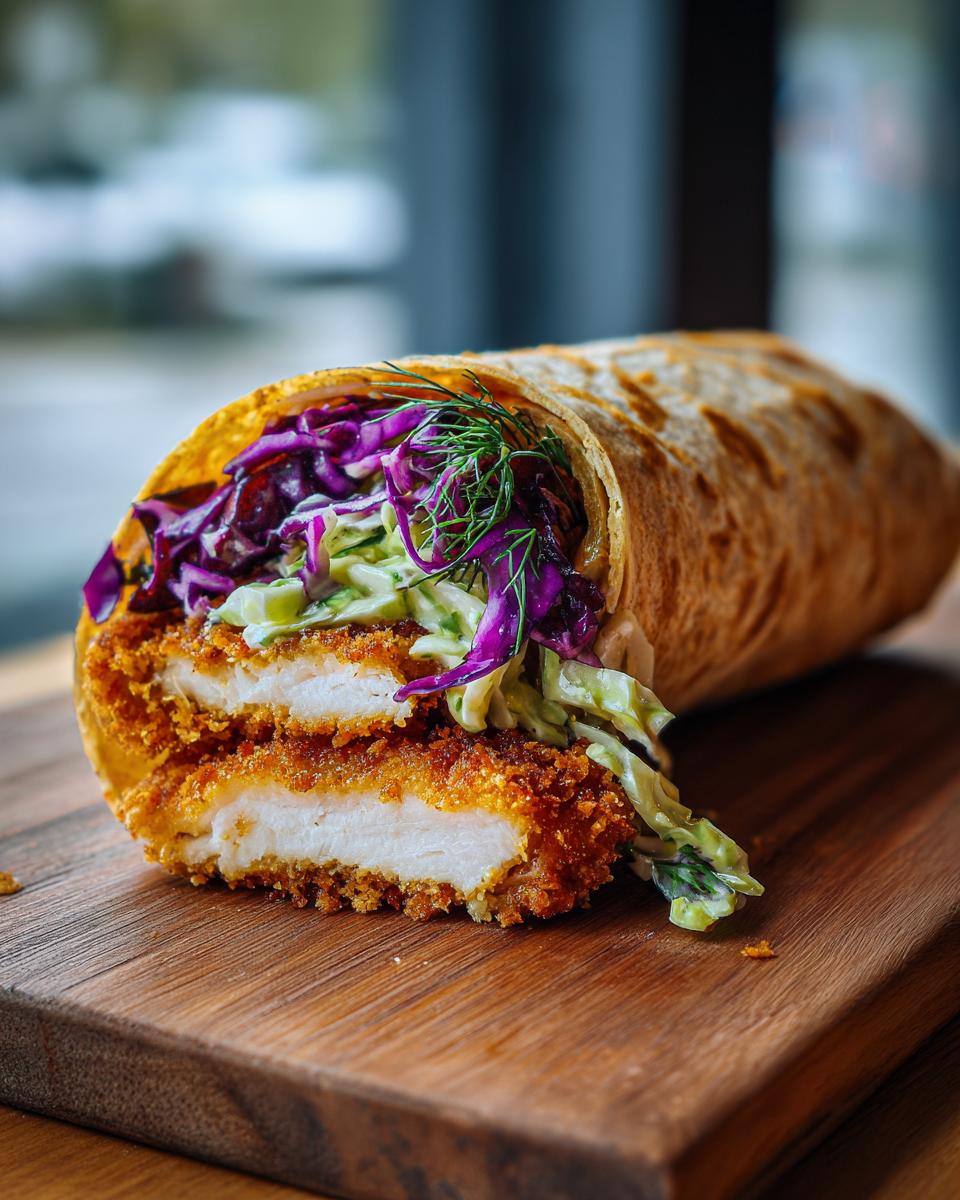
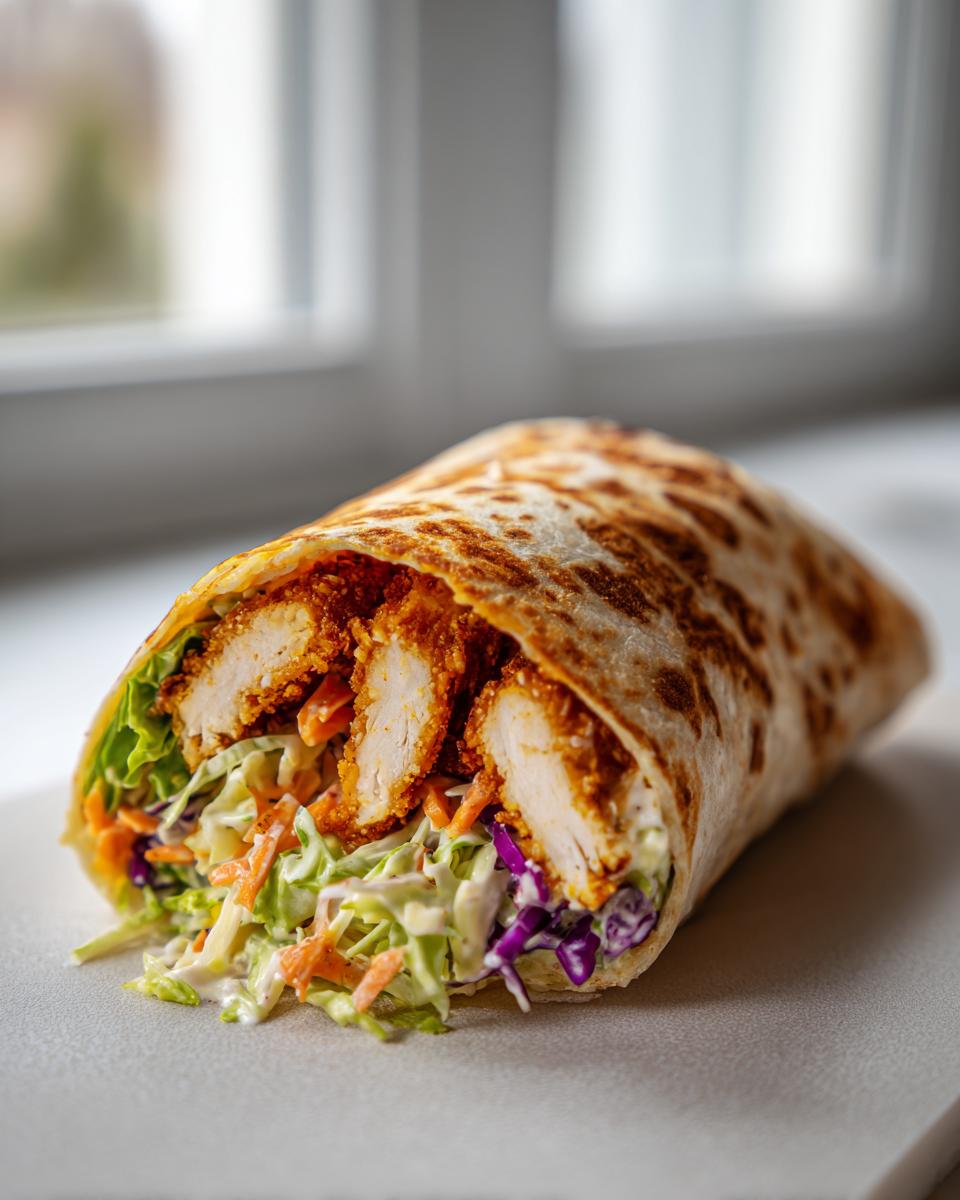
Lunchtime always feels like a race against the clock, doesn’t it? I needed something incredibly satisfying that didn’t take hours to pull together, and frankly, I was tired of soggy leftovers. That’s how I landed on this version of the Crunchy Chicken Wrap With Dill Pickle Coleslaw. Trust me, the minute you bite into that crisp chicken followed by the bright, tangy zing of the slaw, you’ll understand why this combination became my absolute go-to. Forget dull desk lunches; this wrap is loud, proud, and packed with textures that just work perfectly together. It’s seriously the best 35-minute meal you’ll make all week.

Why This Crunchy Chicken Wrap With Dill Pickle Coleslaw Works (EEAT Focus)
Okay, so why is this wrap a guaranteed winner? It all comes down to contrast. We’re not settling for soft chicken wrapped in limp lettuce here, no way! The secret sauce is twofold: maximum crunch from our chicken crust and that mouth-puckering tang from the slaw. You need that auditory crunch when you bite in; it just signals flavor, right?
We achieve that serious crispiness because we only use Panko breadcrumbs. Panko are lighter and flakier than standard breadcrumbs, which means they absorb less oil and stay airy while frying. That quality of ingredient truly makes a difference in the final texture.
Then we hit it with the dill pickle coleslaw. The slaw brings the moisture, sure, but more importantly, it brings that sharp vinegar counterpoint to the richness of the fried chicken. It cuts right through everything beautifully. It’s that classic pairing—creamy, fatty, crispy hitting the bright, acidic, cool flavors. If you love the way a pickle cuts through a rich sandwich, you’ll see why I even included pickle flavor in my cheese puffs!
It’s this intentional layering of texture and flavor that elevates this simple wrap into something truly memorable. You get savory, salty, and sour all in one perfect bite.
Ingredients for Your Crunchy Chicken Wrap With Dill Pickle Coleslaw
I always say that a great recipe starts with great ingredient prep. Laying everything out makes the actual cooking time fly by, especially when you’re dealing with a crunch factor! Don’t skimp on setting up your breading station correctly; it’s the key to even coating. Once you see how vibrant the slaw ingredients are, you’ll get why they make such a kicky side note to the chicken. Seriously, these ingredients scream summer, even if you’re making them in January. If you like intense pickle flavor, you might want to check out how I use it when I make fried pickles, because it’s that same level of delicious satisfaction!
For the Crispy Chicken
- 4 boneless, skinless chicken breasts, pounded thinly to about 1/2 inch thickness
- 1 cup all-purpose flour
- 1 teaspoon salt (for dredging mix)
- 1/2 teaspoon black pepper (for dredging mix)
- 1/2 teaspoon paprika (for dredging mix)
- 2 large eggs, beaten well (for the wet dip)
- 1 cup Panko breadcrumbs (this is essential for the crunch!)
- 1/2 cup vegetable oil, for frying (or enough to coat the bottom of your skillet by about 1/4 inch)
For the Dill Pickle Coleslaw
- 1 cup shredded green cabbage
- 1/2 cup shredded red cabbage
- 1/4 cup mayonnaise (use the good stuff!)
- 2 tablespoons dill pickle juice (don’t use fresh pickle slices here, we need the juice!)
- 1 tablespoon chopped fresh dill (it makes a huge difference, trust me)
- 1/4 cup finely chopped dill pickles
- 1/4 cup shredded carrots
For Assembly
- 4 large flour tortillas (the soft, pliable kind)
Step-by-Step Instructions for the Crunchy Chicken Wrap With Dill Pickle Coleslaw
Alright, this is where the magic happens! Because we need that perfect golden crust, the order of operations matters a ton. Don’t try to multi-task too much; focus on getting that chicken coated perfectly before it even thinks about hitting the hot oil. If you want truly robust breading that doesn’t fall off in the pan, stick right to these steps. It’s just like making crispy panko shrimp, but using chicken!
Preparing the Chicken Cutlets
- First things first: take those chicken breasts and pound them gently but firmly until they are all about 1/2 inch thick. This ensures they cook quickly and evenly, which is key when frying.
- Now, set up your breading station so it flows right to left: Plate one has the flour mixed with salt, pepper, and paprika. Plate two has your two beaten eggs. Plate three has all of your Panko breadcrumbs ready to go.
- Dredge each piece of chicken first by dipping it into the spiced flour. Make sure you shake off every bit of excess flour—we only want a light dusting here.
- Next, dunk that floured chicken into the egg wash. Let the extra egg drip back into the bowl for just a second.
- Finally, coat the chicken thoroughly in the Panko. This is where you need to be firm: press that breadcrumb mixture right onto the chicken so it really sticks!
Frying the Chicken to Golden Perfection
- Place your skillet over medium-high heat and add your vegetable oil. You want that oil shimmering before the chicken goes in, which usually means it’s around 350°F.
- Carefully place the breaded chicken into the hot oil. Do not overcrowd the pan, or the oil temperature will drop and make your chicken greasy.
- Fry for about 4 to 5 minutes per side. We’re looking for that beautiful, deep golden-brown color. You must make sure the internal temperature hits 165°F to be safe!
- When they look perfect, transfer the cooked chicken pieces immediately to a wire rack set over a baking sheet to drain. Don’t use paper towels because they trap steam and ruin the crunch!
Mixing the Dill Pickle Coleslaw
- While the chicken is either cooking or resting, you can make the slaw. In a medium bowl, toss together the green cabbage, red cabbage, finely chopped dill pickles, and shredded carrots.
- In a separate, small bowl, whisk together the dressing ingredients: the mayonnaise, the precious dill pickle juice, and the fresh, chopped dill. Don’t skip the fresh dill; it wakes everything up!
- Pour that creamy dressing right over your cabbage mixture. Toss it gently but thoroughly until everything is coated evenly. We want every shred tasting like a dill pickle dream.
Assembling Your Crunchy Chicken Wrap With Dill Pickle Coleslaw
- Once the chicken has rested for a minute or two, slice each piece thinly against the grain so it rolls up nicely in the tortilla.
- Take your large flour tortillas and warm them up briefly—either in a dry pan for 15 seconds per side or wrapped in a damp paper towel in the microwave. Soft tortillas wrap better!
- Lay the warmed tortilla flat. Place your sliced chicken down the center. Don’t overfill it!
- Top the chicken with a hearty scoop of the Dill Pickle Coleslaw.
- Now for the closure: Fold the sides of the tortilla inward over the filling, then grab the bottom edge and roll it up tightly from the bottom seam upward to keep everything tucked in. Serve these beauties right away while that chicken is screaming hot and crispy!
Tips for the Ultimate Crunchy Chicken Wrap With Dill Pickle Coleslaw
I’ve made this wrap so many times now, for rushed weekday lunches and for relaxed weekend dinners, and I’ve figured out a few crucial tricks to make sure it’s perfect every single time. Honestly, maintaining that crispiness is the main mission here, so everything revolves around temperature and moisture control!
The most important step I discovered? Pop those breaded cutlets into the freezer for about 10 minutes right after you coat them in the Panko. I know it seems weird, but chilling the breading sets it firmly against the chicken. When it hits the hot oil, that crust doesn’t have time to slough off; it locks in place immediately. Trust me, this one little trick delivers noticeably better adherence!
If you are trying to keep things a little lighter—and I totally get that—you can absolutely bake the chicken instead of frying. It won’t have that same deep-fried richness, but it gets gloriously brown and crunchy if you follow the advice from our chicken burger recipe notes. Just make sure you’re using a wire rack inside your baking sheet when baking at 400°F for 20 to 25 minutes. That air circulation underneath stops the bottom from steaming itself soggy—we need airflow!
Also, here’s a thing about the coleslaw: you must dress it right before serving, or at least within 30 minutes of eating! Those pickles and that pickle juice are powerful; if you dress the slaw too early, the cabbage will wilt down too much, and we’re aiming for crunch in the slaw, not mush. Fresh cabbage crunch is what we crave!
Ingredient Notes and Substitutions for Your Crunchy Chicken Wrap With Dill Pickle Coleslaw
People always ask me if they can cut corners on the ingredients, especially when trying to make this quick lunch come together even faster. Look, for the best flavor and texture, you really can’t substitute the core components, but I totally get needing flexibility! Let’s talk about what you absolutely need and what you can swap out if necessary.
The single most important ingredient for achieving that signature texture is the Panko breadcrumbs. I cannot stress this enough: do not swap standard Italian-style breadcrumbs for Panko here. Standard breadcrumbs are too fine and they become dense and almost pasty when fried, absorbing too much oil. Panko, on the other hand, are those big, airy flakes that stay light and shatteringly crisp against the chicken. They are the backbone of the crunch in this wrap, so hunt down a box of Panko!
When it comes to the chicken itself, if breasts feel too bulky, feel free to use boneless, skinless chicken tenders. You skip the pounding step, which is nice, but you might need to adjust the frying time slightly as tenders are naturally thinner. Chicken thighs actually work beautifully too—they stay moister because they have more fat, but make sure you trim off any thick bits of skin or excess fat before you bread them.
Now, about that cabbage for the slaw. If you’re truly in a rush, using a pre-shredded coleslaw mix is fine. Just remember that pre-shredded mixes are often cut finer than what my recipe calls for, so they might soften up faster under the dressing. Using fresh cabbage gives you that robust, crunchy bite that holds up better against the warm chicken.
A little side note for those of you trying to avoid dairy or looking for alternatives for the dressing; while I haven’t tried it myself in this specific slaw yet, you can certainly experiment with a dairy-free mayonnaise if that helps you out. For richness elsewhere in the kitchen, I sometimes whip up my own heavy cream substitute, but for the slaw, the mayonnaise texture is critical for that creamy coating!
Serving Suggestions for Your Crunchy Chicken Wrap With Dill Pickle Coleslaw
So, you’ve got this amazing, flavor-packed, crunchy chicken wrap sitting there, right? It’s a meal all on its own, seriously. But if you’re serving this for a bigger lunch or you just have a bigger appetite (I know I do sometimes!), you need a side that plays nice without stealing the show. We don’t want anything too heavy competing with that crispy chicken and tangy slaw!
My first thought for perfect balance is always something starchy and slightly sweet to offset the salty, vinegary profile of the wrap. Sweet potato fries are the absolute answer here. They get wonderfully caramelized in the oven, and that touch of natural sweetness is just Heaven next to the dill pickle juice.
If you’re looking for something on the lighter side, because the wrap is already quite rich from the mayo in the slaw and the fried chicken, you can’t go wrong with a super simple green salad. I’m talking baby spinach or maybe some crisp butter lettuce. Dress it with the lightest vinaigrette you have—something lemon-based works great because it echoes the acid from the pickles in the wrap.
Another favorite combination of mine, especially when I have time to roast something quickly while the chicken cools down, is honey-roasted carrots. That savory sweetness plays so well with the saltiness of the chicken coating. Honestly, anything that leans slightly sweet or tart works perfectly to complement the robust flavors we built into this wrap. You can check out my tips for making the ultimate honey-roasted carrots if you need a quick veggie side!
The goal is simple: something easy to manage while you are enjoying the main event, and something that cuts the richness just a little bit so you can eat the whole thing without feeling weighed down. Happy wrapping!
Storage and Reheating the Crunchy Chicken Wrap With Dill Pickle Coleslaw
Let’s be real, these Crunchy Chicken Wraps are absolutely, one hundred percent, ten times better when they are made fresh and eaten immediately. That initial crunch of the chicken against the cool, crisp slaw is unbeatable! If you have leftovers, though, don’t toss them out! We just have to be strategic about how we keep them, because the enemy of a great crunchy wrap is moisture creeping in overnight.
If you know you’re going to have extras, the best way to store them is to deconstruct the wrap before you refrigerate it. Keep the sliced, cooked chicken tucked away in an airtight container on its own. The real key is to keep the Dill Pickle Coleslaw in its dedicated container, too. Don’t let that dressing sit against the cabbage for too long, and definitely don’t let it touch the chicken!
When you’re ready for lunch round two, that chicken needs a reheat to bring back that glorious crispness that moisture tried to steal overnight. Do not, under any circumstances, use the microwave for the chicken. It will turn that Panko crust rubbery faster than you can say “pickle juice.”
Instead, you have two great options for reviving that crunch:
- The Oven or Toaster Oven: This is my preferred method. Spread the cold, cooked chicken slices on a baking sheet and heat them up in a 375°F oven for about 8 to 10 minutes. This dries out the exterior slightly and brings the chicken back up to temp while crisping the breading.
- The Air Fryer: If you have one of these magic boxes, use it! Set your air fryer to 375°F and cook the chicken pieces for just 4 minutes. It’s the fastest way to bring back that texture.
Once the chicken is hot and crispy again, warm your tortilla briefly as you always do. Then, reassemble the wrap fresh: chicken first, then add a scoop of the chilled coleslaw right on top before rolling it up tight. If you do it this way, that wrap will taste almost as good as the first time you made it!
Frequently Asked Questions About the Crunchy Chicken Wrap With Dill Pickle Coleslaw
I get so many emails asking about tweaks and substitutions for this recipe, which just goes to show how much you all love a good, noisy crunch! I’ve gathered the most common questions I hear about making the perfect Crunchy Chicken Wrap With Dill Pickle Coleslaw. Hopefully, this helps you customize it for your own kitchen!
How can I make this Crunchy Chicken Wrap With Dill Pickle Coleslaw healthier?
That’s a fantastic question, especially if you’re planning on having these wraps often! The biggest change you can make for a lighter meal is skipping the frying step entirely. You can totally bake those breaded chicken cutlets. Just follow the instructions for breading so you get that nice Panko layer, then pop them onto a wire rack on a baking sheet. Bake them at 400°F for about 20 to 25 minutes. They get beautifully crispy without the extra oil, making for a much lower-fat version.
Also, think about your carrier! While I love the soft chew of classic flour tortillas, swapping those out for a whole wheat or low-carb tortilla can bump up your fiber content significantly. Every little bit helps keep this lunch light and energized!
Can I prepare the Dill Pickle Coleslaw ahead of time?
You sure can get a head start on the slaw, but you have to be smart about it, because that fresh cabbage wilts if it sits in dressing too long. If you want to prep ahead, I recommend mixing all the dry slaw components—the cabbages, the shredded carrots, and the chopped pickles—and keeping that mixture in an airtight container in the fridge.
Then, keep the dressing (the mayo, pickle juice, and dill) separate in its own little jar. When you pull everything out to assemble your wraps, just toss the dressing into the cabbage mix right before you start slicing the chicken. That way, you get the maximum crunch from the dill pickle slaw when you finally wrap it all up. That tang is meant to be bright!
If you end up with leftover chicken strips, they are wonderful cold in a salad too, maybe even added to my chicken salad recipe for a completely different flavor profile the next day!
Nutritional Estimates for This Chicken Wrap
Now, I’ll be the first to admit that when I’m making these amazing wraps, I’m not exactly thinking about the macronutrients! I’m focused on the crunch and the zing, honestly. But I know many of you track things closely, so I ran the recipe numbers through a standard calculator to give you a baseline estimate.
Remember these numbers are just a guide, okay? They are based on using the standard ingredients listed—four chicken breasts, the amount of oil absorbed during frying, and regular mayonnaise. If you use chicken thighs or bake the chicken instead of frying, your numbers are going to shift pretty dramatically. It’s always best to treat these as starting inspiration rather than gospel!
Here’s the general snapshot for one full, loaded wrap (which is a pretty big serving, by the way!):
- Serving Size: 1 wrap
- Calories: 550
- Fat: 22g (with 4g of that being Saturated Fat)
- Carbohydrates: 45g
- Protein: 48g (That chicken really packs a punch!)
- Sodium: 850mg
- Sugar: 7g
See? Nearly 50 grams of protein in one lunch—that’s why this wrap keeps me going all afternoon! It feels hearty without being overly heavy on the sugar front, thanks mostly to all that great mayonnaise base in the slaw carrying the flavor. If you’re watching your sodium, maybe pull back just a pinch on the salt you add in the flour dredge, or use a low-sodium Panko if you can find it. Enjoy knowing you’re eating something absolutely delicious that keeps you fueled!
Share Your Crunchy Chicken Wrap With Dill Pickle Coleslaw Experience
That’s it, my friends! You’ve got the crunchy chicken, you’ve got the zesty, tangy dill pickle coleslaw, and now you have the ultimate roadmap for assembling the best, most satisfying lunch wrap you’ve ever made at home.
I put all my heart into perfecting that ratio of crunch to tang, so now I’m dying to know what you think! Seriously, don’t be shy. Did you add a twist? Maybe you decided to toss in some crispy fried onions with the slaw? Or perhaps you went crazy and added smoked paprika to the breading?
I absolutely love hearing about your kitchen experiments. Please come back here and leave a quick comment letting me know how much time it took you, if the chicken stayed crispy, and if your family immediately asked for it again next week! We all learn so much from each other’s successes—and even the little oopsies!
And if you snapped a photo of your beautiful, perfectly rolled Crunchy Chicken Wrap With Dill Pickle Coleslaw peeking out of the tortilla, please share it on social media! Tag me so I can see your handiwork, and if you have any burning questions that I missed above, you can always reach out directly through my contact page. Happy wrapping, everyone!
Print
Crunchy Chicken Wrap With Dill Pickle Coleslaw
- Total Time: 35 min
- Yield: 4 servings 1x
- Diet: Low Fat
Description
A recipe for a chicken wrap featuring crispy chicken and a tangy dill pickle coleslaw.
Ingredients
- 4 boneless, skinless chicken breasts
- 1 cup all-purpose flour
- 1 teaspoon salt
- 1/2 teaspoon black pepper
- 1/2 teaspoon paprika
- 2 large eggs, beaten
- 1 cup panko breadcrumbs
- 1/2 cup vegetable oil for frying
- 4 large flour tortillas
- 1 cup shredded green cabbage
- 1/2 cup shredded red cabbage
- 1/4 cup mayonnaise
- 2 tablespoons dill pickle juice
- 1 tablespoon chopped fresh dill
- 1/4 cup finely chopped dill pickles
- 1/4 cup shredded carrots
Instructions
- Pound chicken breasts to 1/2 inch thickness.
- Set up a breading station: place flour mixed with salt, pepper, and paprika on one plate. Place beaten eggs on a second plate. Place panko breadcrumbs on a third plate.
- Dredge each chicken breast first in the flour mixture, shaking off excess.
- Dip the floured chicken into the egg, letting excess drip off.
- Coat the chicken thoroughly in the panko breadcrumbs, pressing gently to adhere.
- Heat vegetable oil in a large skillet over medium-high heat.
- Fry chicken for 4-5 minutes per side, until golden brown and cooked through (internal temperature 165°F). Remove chicken and place on a wire rack to drain.
- While chicken cooks, prepare the coleslaw: In a medium bowl, combine shredded green cabbage, red cabbage, chopped dill pickles, and shredded carrots.
- In a small bowl, whisk together mayonnaise, dill pickle juice, and fresh dill.
- Pour the dressing over the cabbage mixture and toss to coat evenly.
- Slice the cooked chicken breasts thinly.
- Warm the flour tortillas briefly.
- Place sliced chicken down the center of each tortilla. Top the chicken with a portion of the dill pickle coleslaw.
- Fold the sides of the tortilla inward, then roll tightly from the bottom to create a wrap. Serve immediately.
Notes
- You can bake the chicken instead of frying for a lower fat option. Bake at 400°F for 20-25 minutes.
- Use pre-shredded coleslaw mix to save prep time.
- Prep Time: 20 min
- Cook Time: 15 min
- Category: Lunch
- Method: Frying
- Cuisine: American
Nutrition
- Serving Size: 1 wrap
- Calories: 550
- Sugar: 7
- Sodium: 850
- Fat: 22
- Saturated Fat: 4
- Unsaturated Fat: 18
- Trans Fat: 0
- Carbohydrates: 45
- Fiber: 3
- Protein: 48
- Cholesterol: 110
Keywords: chicken wrap, crispy chicken, dill pickle, coleslaw, sandwich, lunch