Okay, so you know how sometimes you just need a dessert that feels like a warm hug? That’s exactly what banana pudding is for me. It’s pure comfort food, right? But what if you could make it even better? What if you added… chocolate?! Trust me on this, adding rich cocoa changes the game completely. These Chocolate Banana Pudding Cups are seriously my go-to when I need something quick, delicious, and totally satisfying. I’ve been whipping up homemade desserts for years, and this twist on a classic is always a winner. They’re ridiculously easy to make, layered with creamy chocolate pudding, sweet bananas, and those perfect little vanilla wafers. Get ready for everyone to ask for the recipe!

Why You’ll Love These Chocolate Banana Pudding Cups
Alright, let’s get down to brass tacks. Why are these Chocolate Banana Pudding Cups going to become your new favorite thing? Because they tick all the right boxes!
- Seriously Easy Peasy: No fancy equipment, no crazy techniques. If you can whisk and layer, you can make these. It’s perfect for when you want something impressive without hours of work.
- That Flavor Combo, Though: Chocolate and banana are just meant to be together. The rich, slightly bitter cocoa is the perfect partner for the sweet, soft banana. It’s a match made in dessert heaven!
- Pure Comfort in a Cup: The creamy pudding, the soft bananas, the slightly yielding vanilla wafers… it’s a texture dream! Every bite is like snuggling up with a cozy blanket.
- Crowd-Pleasing Champ: I’ve never made these and *not* had people rave about them. They disappear fast at potlucks, parties, or just a casual Sunday dinner. Kids and adults alike adore them!
See? What’s not to love?!

Gathering Your Ingredients for Chocolate Banana Pudding Cups
Okay, time to get our hands on the goodies! The beauty of these Chocolate Banana Pudding Cups is that you probably have most of this stuff hanging around your pantry already. No obscure ingredients needed, just simple things that come together for something magical. Here’s what you’ll need to gather up:
- 1/2 cup granulated sugar: Just your basic white sugar to get that perfect sweetness.
- 1/4 cup unsweetened cocoa powder: Make sure it’s unsweetened! This gives us that deep, chocolatey flavor without being overly sweet.
- 1/4 cup cornstarch: This is our thickening agent for the pudding. It’s what makes it so wonderfully creamy!
- 1/4 teaspoon salt: A little pinch of salt brings out all the other flavors. Don’t skip it!
- 2 cups milk: Any kind of milk you have on hand should work! I usually use whole milk for extra richness, but 2% is fine too.
- 2 large eggs, beaten: These help thicken the pudding and give it a lovely, smooth texture.
- 2 tablespoons butter: Butter adds richness and a silky finish to the pudding.
- 1 teaspoon vanilla extract: Pure vanilla extract is best for that classic pudding flavor.
- 4 ripe bananas, sliced: The star of the show! Make sure they’re ripe, but not overly mushy.
- 1 box vanilla wafer cookies: These are the classic base for banana pudding. They get soft and cake-like as they soak up the pudding and banana goodness.
Detailed Ingredient Notes for Perfect Chocolate Banana Pudding Cups
Just a few quick tips on those ingredients to make sure your Chocolate Banana Pudding Cups are absolutely spot on. First, those bananas! You want them ripe, like yellow with maybe a few brown spots. They’ll be sweeter and easier to slice. For the **vanilla wafers**, feel free to get creative! Graham crackers or even shortbread cookies work nicely too. And definitely stick with **unsweetened cocoa powder** – it gives you control over the sweetness and a richer chocolate taste.
Essential Equipment for Making Chocolate Banana Pudding Cups
Okay, before we dive into the fun part of actually making the pudding, let’s just quickly chat about the tools you’ll need. Nothing fancy here, just your basic kitchen essentials! You probably have all of this already.
- Medium Saucepan: This is where the magic happens with our chocolate pudding base. A good, sturdy one is best.
- Whisk: Your best friend for making sure that pudding is smooth and lump-free!
- Mixing Bowls: You’ll need a couple – one for whisking those eggs separately and maybe another for the finished pudding before it chills.
- Measuring Cups and Spoons: Gotta be accurate with those ingredients!
- Serving Cups: Individual cups or bowls are perfect for layering everything up. Little mason jars are my favorite for these!
That’s it! See? Super simple. Now we’re ready to get cooking!
Step-by-Step Guide to Crafting Your Chocolate Banana Pudding Cups
Alright, let’s get our hands a little messy! This is where those simple ingredients turn into something truly special. Making these Chocolate Banana Pudding Cups is a breeze, I promise. Just follow these steps, and you’ll be digging into creamy, chocolatey goodness before you know it!
First, we’ll tackle that gorgeous chocolate pudding base. Don’t be intimidated, it’s easier than you think!
- Grab your medium saucepan. Whisk together the granulated sugar, unsweetened cocoa powder, cornstarch, and salt right in the pan. Get all those dry ingredients nice and combined.
- Now, slowly start whisking in the milk. Do it gradually at first, really whisking out any lumps, until it’s all smooth and lovely.
- Put the saucepan over medium heat. This is the part where you gotta stay with it! Keep stirring *constantly* with that whisk. You’ll see it start to thicken and bubble. Once it’s bubbling and thick (like, coating the back of a spoon thick!), take it off the heat.
- In a small separate bowl, whisk those beaten eggs. Now, carefully take a small amount (maybe a ladleful) of the hot pudding and *slowly* whisk it into the eggs. This is called tempering, and it stops the eggs from scrambling!
- Pour that egg mixture back into the saucepan with the rest of the hot pudding. Whisk like crazy again, making sure it’s all mixed in smoothly.
- Pop the pan back on medium heat, but just for about a minute more. Keep stirring constantly!
- Take it off the heat for the last time. Stir in the butter and vanilla extract until they’re completely melted and the pudding is super smooth and glossy. Wow, it smells good already, right?!
- Pour that beautiful pudding into a bowl. This next part is important to avoid that weird skin on top – press plastic wrap *directly* onto the surface of the pudding. Like, touching it completely.
- Now comes the hard part: waiting! Chill the pudding for at least 2 hours in the fridge. It needs to be nice and cold and set up.
Once your pudding is perfectly chilled and ready, it’s time for the fun part: assembling those cups!
- Grab your individual serving cups or bowls. Start with a layer of vanilla wafer cookies on the bottom.
- Next, add a layer of your sliced ripe bananas.
- Spoon a generous layer of that chilled chocolate pudding over the bananas and cookies.
- Repeat those layers! Another layer of cookies, then bananas, then pudding. Keep going until your cups are filled up.
- Pop those assembled cups back in the fridge for at least another 30 minutes. This lets the flavors meld and the cookies soften just a little.
And there you have it! Your very own delicious Chocolate Banana Pudding Cups, ready to be devoured!
Mastering the Pudding Base for Delicious Chocolate Banana Pudding Cups
Okay, let’s zoom in on making that pudding base perfect. The key here is *patience* and *constant stirring*. Seriously, don’t walk away! Whisking together the dry stuff first makes sure you don’t get lumps. When you add the milk, go slow and whisk well. Heating it over medium heat while stirring continuously is what thickens it up beautifully. Tempering those eggs is a non-negotiable step to get that smooth, creamy texture we’re after. Just follow those steps, and you’ll have a dreamy chocolate pudding ready for layering!
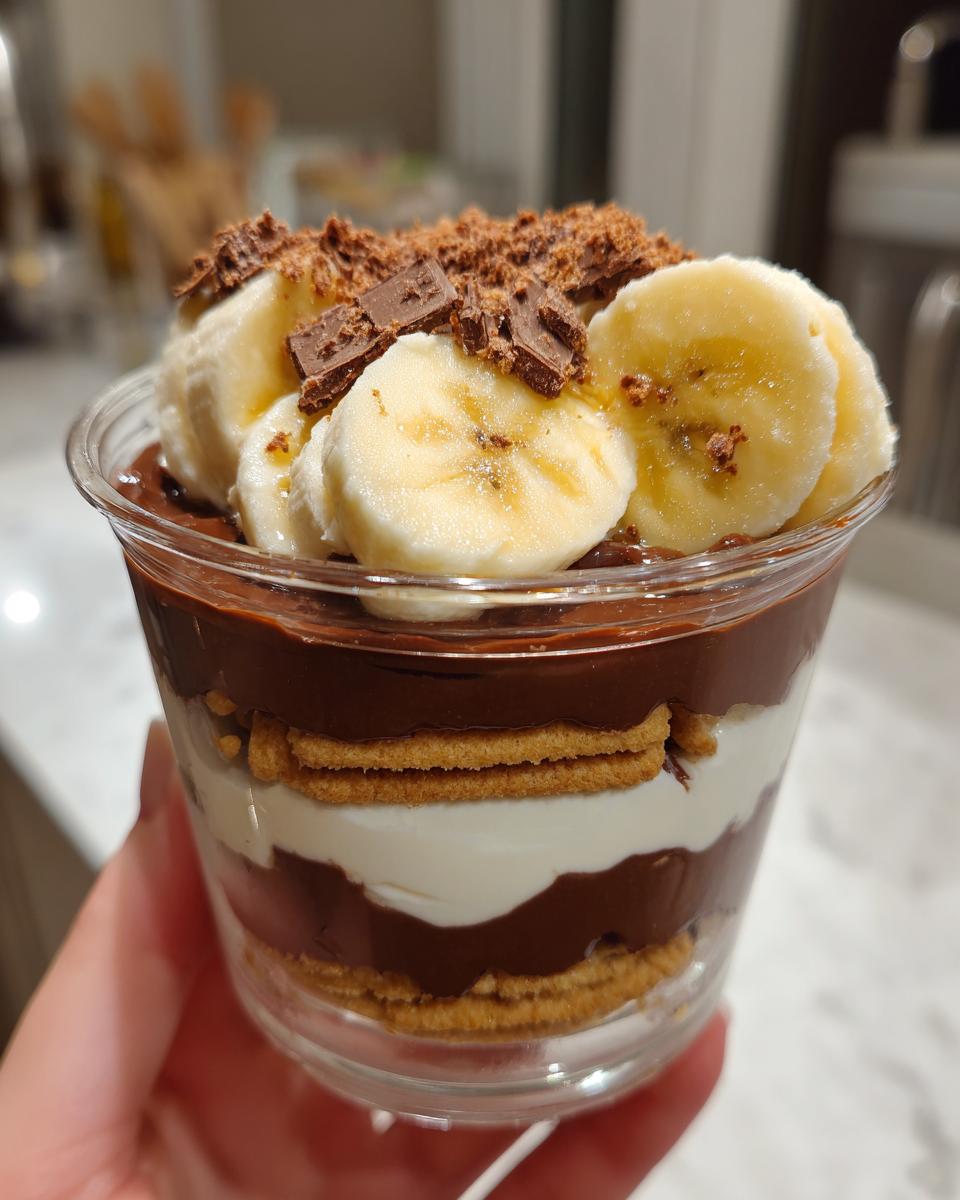
Assembling Your Chocolate Banana Pudding Cups
This is where it all comes together! Building your Chocolate Banana Pudding Cups is like creating little edible sculptures. Start with that base layer of vanilla wafers – they’re going to soak up all that goodness. Then comes the sweet, soft banana slices. Finally, spoon that rich, chilled chocolate pudding over the top. Repeat those layers! Cookies, bananas, pudding. It’s simple, but the combination is pure magic. Give them a final chill for at least 30 minutes to let everything settle and the flavors mingle. So worth the wait!
Storage and Reheating Tips for Chocolate Banana Pudding Cups
Alright, so by some miracle, you actually have some leftover Chocolate Banana Pudding Cups? (Seriously, how?!) Don’t worry, they store beautifully! Just make sure they’re covered tightly. If they’re in individual cups, plastic wrap pressed right on top is your best friend to keep that pudding skin-free and everything tasting fresh. Pop them in the fridge. They’ll stay delicious for about 2-3 days. Since these are a chilled, no-bake treat, there’s absolutely no reheating needed – just grab one from the fridge and enjoy!
Frequently Asked Questions About Chocolate Banana Pudding Cups
Okay, I know you might have a few questions buzzing around in your head as you get ready to make these amazing Chocolate Banana Pudding Cups. Totally normal! Here are some of the things people often ask me:
Q: Can I make these Chocolate Banana Pudding Cups ahead of time?
A: YES! And I highly recommend it, actually. Making the pudding ahead (like the day before) gives it plenty of time to chill and set up perfectly. Assembling the cups a few hours before you plan to serve them is ideal. This gives the cookies just enough time to soften but not get too mushy. If you assemble them *too* far in advance (like more than 8-12 hours), the bananas might get a little brown, though they’ll still taste great!
Q: My chocolate pudding seems too thin. What went wrong?
A: Don’t panic! This usually means it needed to cook a little longer to activate the cornstarch. Make sure you bring it back to medium heat and whisk constantly until it’s bubbling and thick enough to coat the back of a spoon. Sometimes, slight variations in heat or whisking can affect it. If it’s already chilled and still too thin, you could gently reheat it and whisk in a tiny bit more cornstarch mixed with a tablespoon of cold milk (make a slurry first!), then bring it back to a bubble and re-chill.
Q: Can I use different fruits besides bananas in these pudding cups?
A: You absolutely can experiment, but honestly, the chocolate and banana combo is just *chef’s kiss*. Other fruits might work, but they could change the texture and how well they hold up. Soft fruits like sliced strawberries or raspberries could get a bit watery. If you’re feeling adventurous, maybe try sliced cooked apples (like for a pie) or even some pitted cherries, but the classic chocolate banana pudding cups are a winner for a reason!
Q: What kind of cookies can I use if I don’t have vanilla wafers?
A: Great question! While vanilla wafers are traditional, you can totally swap them out. Graham crackers (crushed or broken into pieces) work really well and give it a slightly different flavor. Shortbread cookies or even some simple butter cookies could be delicious too! Just pick something that will soften nicely when layered with the pudding and bananas.
Estimated Nutritional Information
Okay, I know sometimes it’s helpful to have a general idea of what you’re getting into, especially when we’re talking about sweet treats like these Chocolate Banana Pudding Cups! Now, keep in mind, these are just *estimates*. The exact numbers can totally change depending on the specific brands of milk, butter, cookies, and even the size of your bananas. So, think of this as a ballpark figure, not a hard and fast rule, okay?
- Serving Size: About 1 cup
- Calories: Around 450
- Fat: Roughly 15g
- Protein: About 8g
- Carbohydrates: Approximately 70g
Just a little peek into the numbers! The most important thing is to enjoy every single delicious bite of your homemade Chocolate Banana Pudding Cups. Happy eating!
Print
Seriously Simple Chocolate Banana Pudding Cups
- Total Time: 2 hours 25 minutes
- Yield: 6 servings 1x
- Diet: Vegetarian
Description
Delicious and easy-to-make chocolate banana pudding cups.
Ingredients
- 1/2 cup granulated sugar
- 1/4 cup unsweetened cocoa powder
- 1/4 cup cornstarch
- 1/4 teaspoon salt
- 2 cups milk
- 2 large eggs, beaten
- 2 tablespoons butter
- 1 teaspoon vanilla extract
- 4 ripe bananas, sliced
- 1 box vanilla wafer cookies
Instructions
- In a medium saucepan, whisk together sugar, cocoa powder, cornstarch, and salt.
- Gradually whisk in milk until smooth.
- Cook over medium heat, stirring constantly, until the mixture thickens and bubbles.
- Remove from heat.
- In a small bowl, whisk a small amount of the hot pudding into the beaten eggs.
- Pour the egg mixture back into the saucepan, whisking constantly.
- Return to medium heat and cook for 1 minute more, stirring constantly.
- Remove from heat and stir in butter and vanilla extract until smooth.
- Pour pudding into a bowl and press plastic wrap directly onto the surface to prevent a skin from forming.
- Chill for at least 2 hours or until cold.
- To assemble the cups, layer vanilla wafers, sliced bananas, and chilled pudding in individual serving cups.
- Repeat layers until the cups are filled.
- Chill for at least 30 minutes before serving.
Notes
- Use ripe bananas for best flavor.
- Adjust sweetness to your preference.
- You can use other types of cookies like graham crackers.
- Garnish with whipped cream or chocolate shavings if desired.
- Prep Time: 15 minutes
- Cook Time: 10 minutes
- Category: Dessert
- Method: No-bake
- Cuisine: American
Nutrition
- Serving Size: 1 cup
- Calories: 450
- Sugar: 35g
- Sodium: 180mg
- Fat: 15g
- Saturated Fat: 8g
- Unsaturated Fat: 5g
- Trans Fat: 0g
- Carbohydrates: 70g
- Fiber: 3g
- Protein: 8g
- Cholesterol: 90mg
Keywords: chocolate, banana, pudding, dessert, no-bake, easy, sweet, treat