
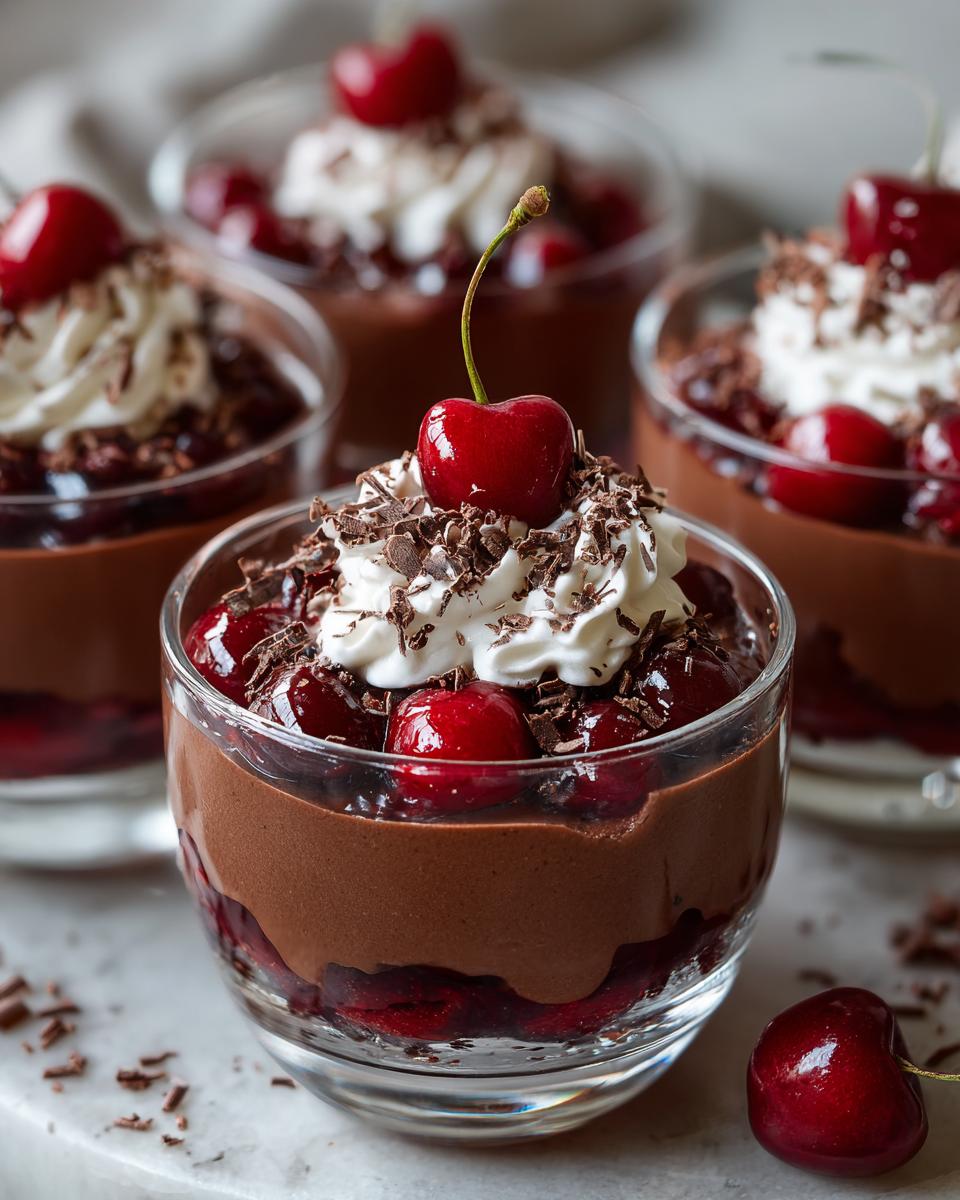
Oh, Black Forest cake! Just saying the name brings back memories of fancy dinners and my grandmother’s impressive creations. But let’s be honest, sometimes you want all that amazing flavor without the fuss of a whole cake, right? That’s where these incredible Black Forest Mousse Cups come in! They capture that perfect blend of rich chocolate, tart cherries, and fluffy cream in individual little glasses. Trust me, they look so elegant, but they’re actually super simple to whip up because, guess what? No baking required! I love making these because they feel so special, like tiny desserts meant just for you. They’re my go-to when I want to impress without spending hours in the kitchen.

Why You’ll Love These Black Forest Mousse Cups
Seriously, these little cups are a dream come true for so many reasons:
- So Easy, No Oven Needed! You get all the Black Forest goodness without turning on the stove. Perfect for when you’re craving something sweet but don’t want the heat.
- Decadent & Rich Flavor: That deep chocolate mousse paired with the tart cherries? Pure magic in every spoonful.
- Looks Super Fancy, But It’s Not: Pop these into pretty glasses and you’ve got an elegant dessert that looks like you spent hours on it.
- Perfect for Any Occasion: Birthdays, holidays, or just a Tuesday night – these are always a hit.
- Customizable Too! You can play around with the cherries and the amount of kirsch (or skip it altogether!).
Ingredients for Your Black Forest Mousse Cups
Alright, gathering your ingredients is the first step to dessert heaven! Here’s what you’ll need to make these dreamy Black Forest Mousse Cups:
- 1 cup heavy whipping cream: Make sure it’s nice and cold for the best whipping results. If you ever need to make your own, check out how to make heavy cream at home!
- 1/4 cup powdered sugar: This gives us that lovely subtle sweetness without making the mousse grainy.
- 1 teaspoon vanilla extract: A little bit of vanilla just rounds out all those flavors beautifully.
- 4 ounces bittersweet chocolate, chopped: Chop it up nice and small so it melts easily. Bittersweet is key for that classic deep chocolate flavor!
- 1/2 cup cherry preserves: This is where that tart cherry magic comes from.
- 1/4 cup kirsch (optional): This is that cherry liqueur that gives traditional Black Forest cake its kick. Totally up to you if you want to use it or keep it kid-friendly!
- Fresh cherries, for garnish: For that final, gorgeous touch.
- Chocolate shavings, for garnish: Because, well, more chocolate!
Keep everything measured out, and you’ll be well on your way!
Crafting the Perfect Black Forest Mousse Cups: Step-by-Step
Alright, let’s get these layers of deliciousness assembled! It’s easier than you think.
- Whip up that cream! Grab a good-sized bowl and your mixer. Pour in that cold heavy cream, the powdered sugar, and the vanilla extract. Start whipping on medium speed and work your way up to high. You want to keep going until you’ve got lovely stiff peaks – you know, when you lift the beaters, the cream stands straight up without drooping. This is super important for a light mousse!
- Melt that chocolate. While your cream is chilling (pop it back in the fridge just to be safe), it’s time for the chocolate. You can do this gently in the microwave in 30-second bursts, stirring each time, or set up a double boiler. Just make sure it melts smoothly. Let it cool *just* a bit so it doesn’t melt our beautiful whipped cream. If it’s too hot, it’ll make the mousse runny!
- Fold it all together. Now for the magic merge! Take about a third of your whipped cream and gently fold it into the slightly cooled melted chocolate. This lightens up the chocolate mixture. Then, gently fold that chocolatey-cream mixture back into the rest of the whipped cream. Be careful not to overmix here – stop as soon as it’s just combined and you have that gorgeous, uniform chocolate mousse. You want to keep all those lovely air bubbles!
- Get your cherry situation ready. If you’re feeling adventurous and want that little kick, gently stir the kirsch right into the cherry preserves. If not, no worries at all – just use the preserves as-is.
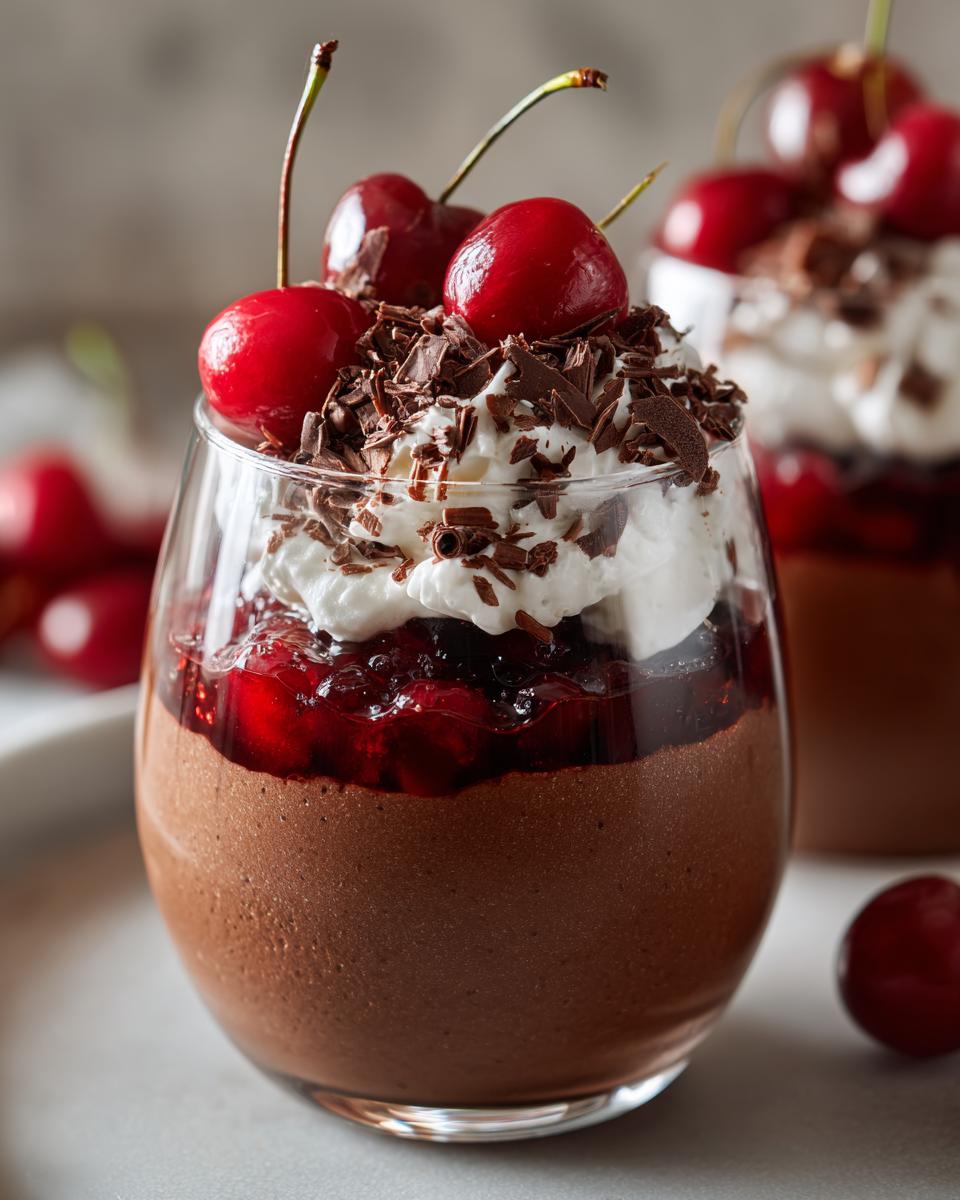
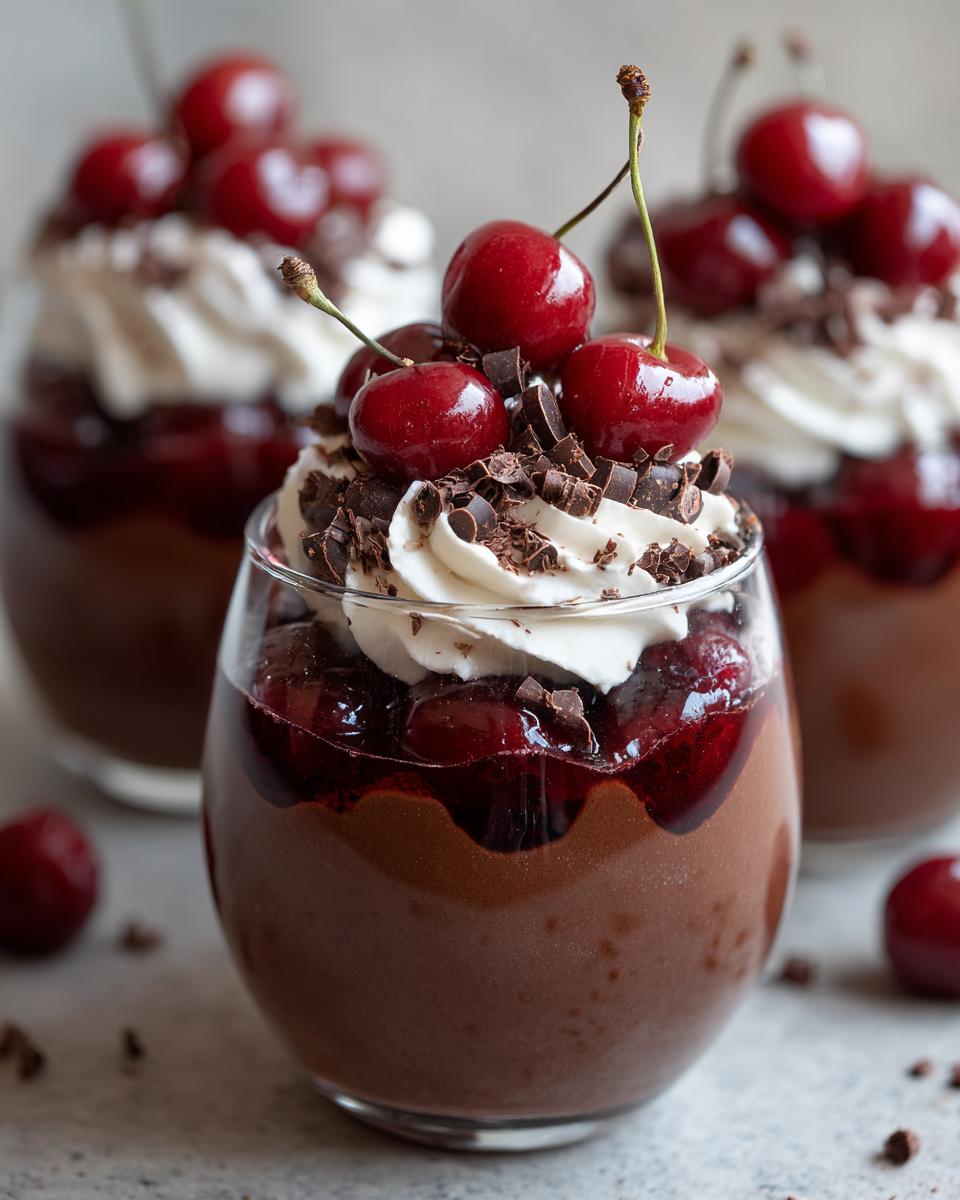
- Start layering! Grab your pretty serving cups (wine glasses, small bowls, whatever you have!). Spoon a good dollop of that amazing chocolate mousse into the bottom of each cup.
- Add the cherry layer. Now lovingly spoon a layer of those cherry preserves right on top of the mousse. Try to get a nice, even layer.
- More mousse, please! Top off each cup with another generous layer of the chocolate mousse. Smooth the tops a bit if you like, or leave them a little rustic.
- Time to chill! This is crucial. Cover those cups (plastic wrap works great) and pop them into the refrigerator for at least an hour. This lets the mousse set up properly and all those flavors get to know each other.
- The grand finale! Once they’re chilled and firm, it’s garnish time! Top each cup with a few fresh cherries and a sprinkle of chocolate shavings. It just makes them feel extra special.
See? Not so tough! And if you’re curious about making a super-quick chocolate cake component for another dessert, check out this easy lava cake recipe.
Tips for Success: Elevating Your Black Forest Mousse Cups
Okay, let’s give these little beauties the superstar treatment they deserve! It’s all about a few key things I’ve learned over the years. First off, use good quality bittersweet chocolate – it *really* makes a difference in that deep chocolate flavor. And when you’re whipping that cream? Go for stiff peaks! That’s what gives the mousse its lovely airiness. Don’t worry if yours isn’t perfectly smooth when you fold in the chocolate; a few little streaks are totally fine and keep it from being overworked. For a really pretty presentation, serve them in clear glasses so everyone can see those gorgeous layers. Oh, and if you’re ever experimenting with similar techniques for making things super fluffy, I found this trick for fluffy brown sugar icing super helpful for understanding the science behind it!
Ingredient Notes and Substitutions for Black Forest Mousse Cups
Let’s chat about the stars of this show! Bittersweet chocolate really gives that classic deep chocolate flavor we love, but you could totally use semi-sweet if that’s what you have on hand. Just maybe taste a bit first because it might make the mousse a touch sweeter. And for our non-alcoholic friends, no worries! Skipping the kirsch is perfectly fine. You still get all that cherry goodness from the preserves. If you can’t find cherry preserves, a good quality cherry pie filling could work in a pinch, though it might be a bit more liquidy and sweeter.
Serving and Storing Your Black Forest Mousse Cups
Now for the fun part – making these Black Forest Mousse Cups look as amazing as they taste! A final flourish of fresh cherries and a light dusting of chocolate shavings takes them over the top. Think of it as the cherry on top of the cherry on top! Since these are no-bake and have that lovely whipped cream component, they really need to party in the fridge. Pop them in there, well-covered, for at least an hour before serving. This helps them set up perfectly. If you happen to have any leftovers (which is rare!), just pop a lid or some plastic wrap on them and they’ll keep beautifully in the refrigerator for about 2 days. You can even get creative with garnishes, maybe a swirl of strawberry whipped cream for a little color surprise!
Frequently Asked Questions about Black Forest Mousse Cups
Got questions? I’ve got answers! My kitchen is always buzzing, and I’ve heard a few things come up when people make these little delights.
Can I make these Black Forest Mousse Cups ahead of time?
Oh yes, absolutely! That’s one of the best parts. You can totally make these a day in advance. In fact, I think they taste even better after chilling for a few hours because all those flavors get to mingle and get really cozy. Just keep them covered in the fridge until you’re ready to add the final garnishes.
What if I don’t have kirsch, or want a kid-friendly version?
No kirsch? No problem! The recipe works wonderfully without it. You’ll still get that delicious cherry flavor from the preserves. If you’re making them for little ones or just prefer to skip the alcohol, simply leave it out. You can even add a tiny splash of almond extract to the preserves for a different kind of subtle flavor if you like!
How do I get those nice, clean layers when assembling?
The trick to gorgeous layers is patience and a gentle hand! When you’re spooning the mousse and preserves, try to place them right in the center of the layer below, rather than spreading right to the edges. This helps prevent them from running together. Also, make sure your mousse isn’t too soft – giving it that hour (or more!) in the fridge to set up is key to keeping those layers distinct and beautiful.
Can I use a different fruit instead of cherries?
While cherries are the classic star here, you can definitely get creative! Raspberry preserves would be absolutely delicious and give it more of a “black forest raspberry” vibe. A good quality strawberry jam could also work, though it might lean a bit sweeter. Just make sure whatever fruit preserve you choose has a nice little tang to balance that rich chocolate.
Is there a way to make these vegan?
Making these vegan would involve a few more swaps! You’d need to use dairy-free whipping cream (like coconut cream or a store-bought vegan whipping cream) and ensure your chocolate is dairy-free. You’d also want to check that your cherry preserves don’t contain any hidden animal products. It’s definitely doable, but it might change the texture a tiny bit. For a totally different but delicious vegan chocolate dessert, you should check out this no-bake Oreo dessert – it’s a crowd-pleaser!
Nutritional Information (Estimated)
Just a little heads-up, the numbers below are estimates because, you know, kitchens can be wild places! Things can vary a bit depending on your exact ingredients, but this should give you a good idea of what you’re working with in these delightful Black Forest Mousse Cups per serving:
- Serving Size: 1 cup
- Calories: ~350
- Fat: ~25g
- Saturated Fat: ~15g
- Unsaturated Fat: ~10g
- Trans Fat: 0g
- Carbohydrates: ~35g
- Sugar: ~30g
- Fiber: ~3g
- Protein: ~4g
- Sodium: ~20mg
- Cholesterol: ~60mg
Remember, these are just ballpark figures to help you out!
Print
Black Forest Mousse Cups
- Total Time: 25 min
- Yield: 4 servings 1x
- Diet: Vegetarian
Description
Rich chocolate mousse layered with cherries and whipped cream.
Ingredients
- 1 cup heavy cream
- 1/4 cup powdered sugar
- 1 teaspoon vanilla extract
- 4 ounces bittersweet chocolate, chopped
- 1/2 cup cherry preserves
- 1/4 cup kirsch (optional)
- Fresh cherries, for garnish
- Chocolate shavings, for garnish
Instructions
- In a bowl, whip heavy cream, powdered sugar, and vanilla extract until stiff peaks form.
- In a separate bowl, melt bittersweet chocolate over a double boiler or in the microwave. Let cool slightly.
- Gently fold the melted chocolate into the whipped cream until just combined.
- If using kirsch, stir it into the cherry preserves.
- Spoon a layer of chocolate mousse into the bottom of serving cups.
- Top with a layer of cherry preserves.
- Add another layer of chocolate mousse.
- Chill for at least 1 hour before serving.
- Garnish with fresh cherries and chocolate shavings.
Notes
- For a non-alcoholic version, omit the kirsch.
- Ensure the chocolate is not too hot when folding it into the cream to prevent melting.
- Prep Time: 20 min
- Cook Time: 5 min
- Category: Dessert
- Method: No Bake
- Cuisine: German
Nutrition
- Serving Size: 1 cup
- Calories: 350
- Sugar: 30g
- Sodium: 20mg
- Fat: 25g
- Saturated Fat: 15g
- Unsaturated Fat: 10g
- Trans Fat: 0g
- Carbohydrates: 35g
- Fiber: 3g
- Protein: 4g
- Cholesterol: 60mg
Keywords: Black Forest, Mousse, Chocolate, Cherry, Dessert, Cups, German