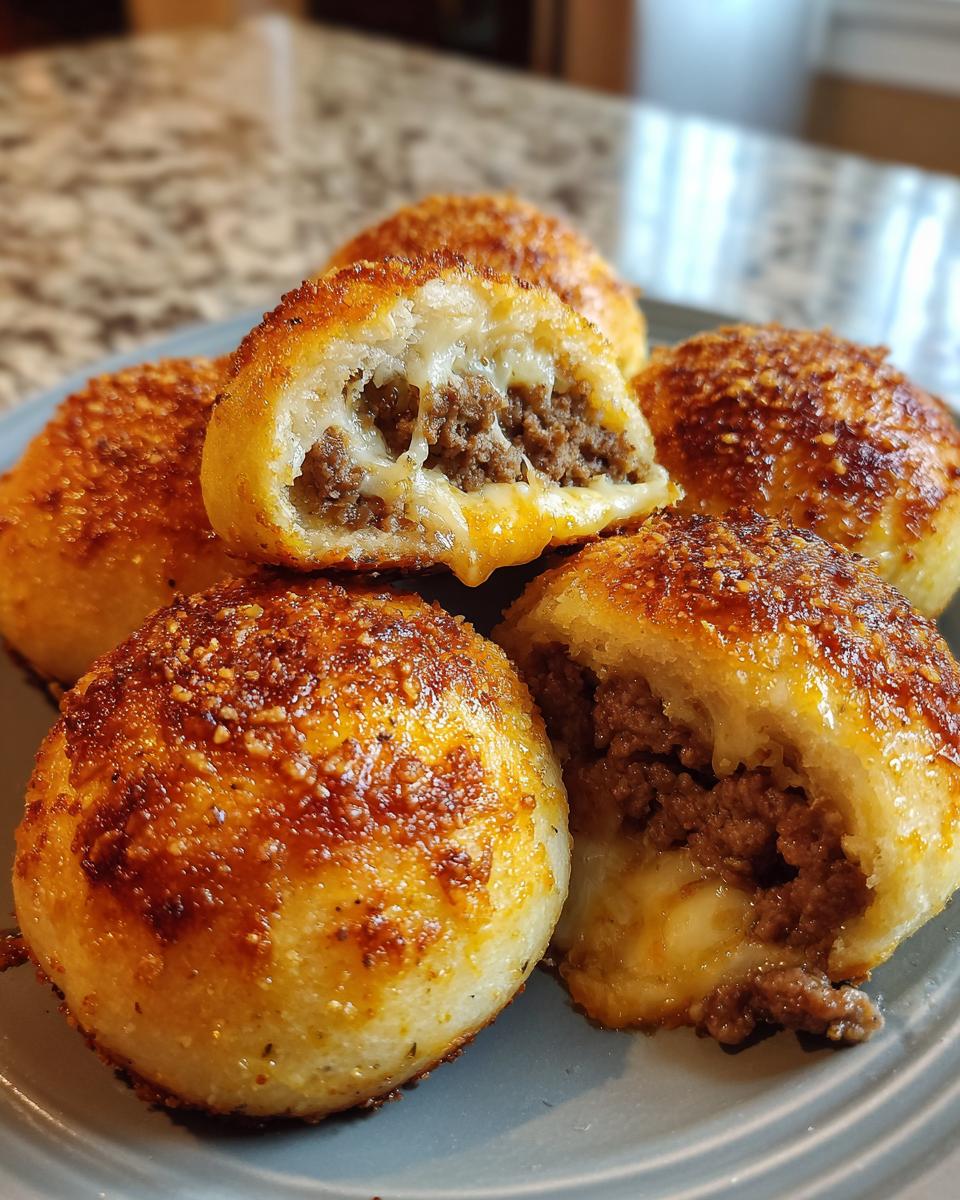
These Garlic Parmesan Cheeseburger Bombs are my go-to when I need a crowd-pleasing appetizer in a hurry – or when I’m just craving something cheesy, garlicky, and downright addictive. They’re little pockets of joy, with seasoned ground beef and melty cheese wrapped in flaky biscuit dough, then brushed with garlic butter and parmesan. I first made them for game night last year, and now my friends won’t let me show up without them! The best part? You probably have most of the ingredients in your kitchen right now. In 30 minutes flat, you’ll have a plate of warm, golden bites that disappear faster than you can say “more please!”

Ingredients for Garlic Parmesan Cheeseburger Bombs
Gathering the right ingredients makes all the difference with these flavor-packed bombs. Here’s what you’ll need – and yes, I’ve learned through trial and error which versions work best!
- 1 lb ground beef (80/20 blend recommended – that bit of extra fat keeps them juicy)
- 1 tube refrigerated biscuit dough (the 8-count works perfectly)
- 1 cup shredded cheddar cheese (trust me, freshly grated melts so much better than pre-shredded!)
- 1/4 cup grated parmesan cheese (the good stuff from the refrigerated section, not the shelf-stable powder)
- 1 tsp garlic powder (or 2 minced fresh cloves if you’re feeling fancy)
- 1/2 tsp onion powder (my secret flavor booster)
- 1/2 tsp salt (I use kosher)
- 1/4 tsp black pepper (freshly cracked if you have it)
- 2 tbsp melted butter (salted or unsalted both work)
- 1 tbsp chopped fresh parsley (optional but pretty)
That’s it! Simple pantry staples transform into something magical. Pro tip: keep the biscuit dough cold until right before using – it’s way easier to handle that way.
How to Make Garlic Parmesan Cheeseburger Bombs
Okay friends, let’s get these bombs rolling! I promise it’s easier than it looks – just follow these simple steps and you’ll have golden, cheesy perfection in no time. The key is working quickly with cold dough and not skipping that butter-parmesan finish (it’s life-changing, I swear!).
Step 1: Prepare the Filling
First things first – preheat that oven to 375°F (190°C). While it’s heating up, grab your favorite heavy skillet (I use my trusty cast iron) and brown the ground beef over medium heat. Break it up really well with a wooden spoon – you want fine crumbles, not big chunks. Once it’s no longer pink, drain off the excess fat (but leave just a little for flavor). Here’s where the magic happens: sprinkle in the garlic powder, onion powder, salt, and pepper. Give it a good stir and let those flavors mingle for about a minute. Your kitchen will smell amazing already!
Step 2: Assemble the Bombs
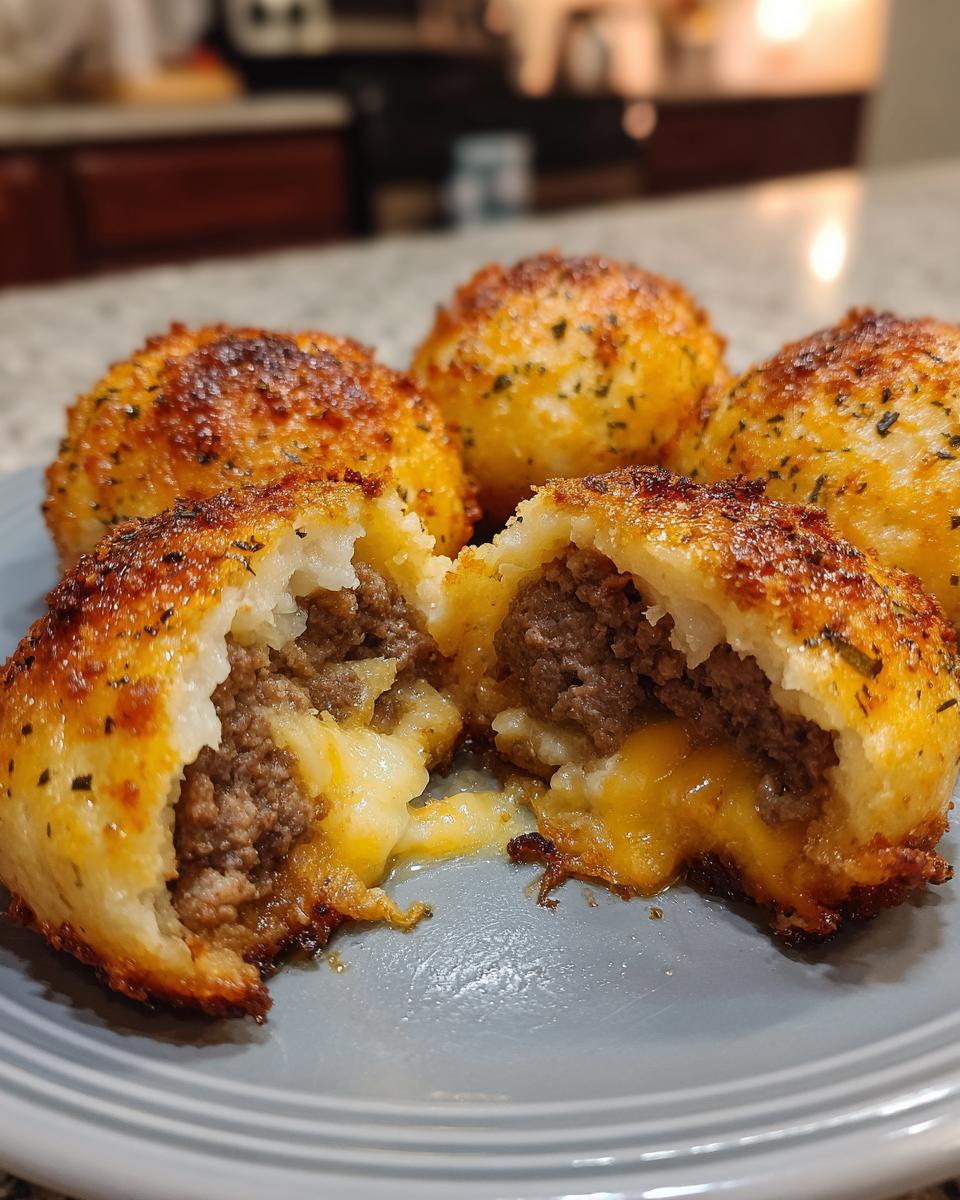
Now for the fun part! Pop open that biscuit tube and separate the dough into 8 pieces. Working one at a time (keep the rest chilled!), gently flatten each biscuit between your palms until it’s about 4 inches across – don’t roll it too thin or it might tear. Spoon about a tablespoon of the beef mixture onto the center, then top with a generous pinch of cheddar cheese. Here’s my pro tip: fold the edges up like a little purse and pinch firmly to seal – really get in there with your fingers! If you see any gaps, the cheese will ooze out (delicious but messy). Arrange them seam-side down on an ungreased baking sheet, leaving some space between each bomb.
Step 3: Bake and Finish
Slide your baking sheet into the oven and set a timer for 12 minutes. At this point, start melting the butter and stirring in that glorious parmesan. When your timer goes off, check the bombs – they should be puffed and just starting to turn golden. Give them another 2-3 minutes if needed (every oven is different). The second they come out of the oven, brush them generously with the garlic-parmesan butter and sprinkle with parsley if you’re feeling fancy. Warning: they’ll be lava-hot inside! Let them cool for about 5 minutes before serving – if you can wait that long.
Tips for Perfect Garlic Parmesan Cheeseburger Bombs
After making these addictive little bombs more times than I can count (my waistline is proof!), I’ve picked up some game-changing tricks that take them from good to “oh-my-gosh-give-me-the-recipe” great. Here are my can’t-live-without tips:
Keep that dough chilly – I can’t stress this enough! If the biscuit dough gets too warm, it turns into a sticky mess that’s impossible to work with. I leave it in the fridge until the very last second, and only take out one biscuit at a time to flatten and fill. If your kitchen is warm, you might even pop the whole tray of assembled bombs in the fridge for 10 minutes before baking.
Mix your cheeses – While cheddar is classic, I sometimes do half cheddar and half pepper jack for a little kick. The parmesan in the butter topping is non-negotiable though – that salty, nutty crust is what makes people go back for thirds! Pro tip: grate your own cheeses if you can. The pre-shredded stuff has anti-caking agents that make it melt weird.
Test one bomb first – If it’s your first time making these, bake just one as a tester. That way you can check if your sealing technique worked (no cheese explosions!) and adjust the baking time if needed. My oven runs hot, so mine are usually perfect at 13 minutes, but every oven is different. Look for that beautiful golden brown color – they’ll keep cooking a bit after coming out of the oven.
Drain that beef well – Too much grease in your filling makes the biscuit dough soggy. After browning the meat, I drain it in a colander and then blot with paper towels. Sounds fussy, but it makes all the difference in texture! While you’re at it, let the filling cool slightly before assembling – piping hot beef will start melting the biscuit dough before it even hits the oven.
Variations of Garlic Parmesan Cheeseburger Bombs
One of my favorite things about this recipe is how easily you can mix it up! Once you’ve mastered the basic version, try these fun twists that keep things interesting. My friends and family love when I surprise them with new flavor combos – it’s like getting a whole new appetizer without learning a new recipe!
Switch up the meat: Ground turkey works beautifully if you’re looking for something leaner (just add an extra teaspoon of olive oil to keep it moist). For game day, I sometimes use spicy Italian sausage – just reduce the added salt since sausage is already seasoned. Vegetarian? Try finely chopped mushrooms sautéed with onions instead!
Cheese adventures: Pepper jack gives these bombs a nice kick, while smoked gouda adds incredible depth. My neighbor swears by blue cheese crumbles mixed into the beef (not for the faint of heart!). For extra gooeyness, tuck a small cube of mozzarella inside with the cheddar.
Flavor boosters: Toss in some diced jalapeños or banana peppers if you like heat. A teaspoon of Worcestershire sauce in the beef mixture adds umami magic. Sometimes I’ll mix minced garlic and parsley right into the melted butter topping – it’s next-level delicious!
The possibilities are endless – that’s the beauty of these little flavor bombs. Just remember the golden rule: don’t overfill them, no matter how tempting it is! Too much stuffing makes sealing tricky and can lead to messy explosions in the oven (learned that one the hard way).
Serving Suggestions
Hot out of the oven is absolutely the best way to enjoy these Garlic Parmesan Cheeseburger Bombs – that’s when the cheese is at its gooiest and the biscuit exterior has that perfect crisp-tender bite. I always serve them immediately on a big platter with small bowls of dipping sauces around the edges. Here’s how I like to round out the experience:
Dipping sauces galore: Marinara sauce is my go-to (the tangy tomato cuts through the richness beautifully), but ranch dressing is always a crowd-pleaser. For something different, try a spicy sriracha mayo or even a quick beer cheese sauce! My husband loves them with barbecue sauce for that classic cheeseburger vibe.
Keep it fresh: A simple side salad balances these indulgent bites perfectly. I’ll often toss together some crisp romaine with cherry tomatoes, red onion, and a light vinaigrette. The freshness cuts through all that cheesy goodness. For parties, I sometimes arrange veggie sticks around the platter too – cucumber, bell peppers, and celery add nice crunch.
Make it a meal: These bombs are substantial enough to be dinner! I’ll serve 2-3 per person with roasted potatoes or sweet potato fries and some steamed broccoli. They’re also fantastic sliced in half and tucked into slider buns with extra toppings – lettuce, tomato, pickles – for the ultimate cheeseburger experience in bite form.
A little warning: they’re irresistible fresh from the oven, but if you need to hold them for a bit, keep them in a single layer on a cooling rack over a baking sheet in a 200°F oven. This prevents the bottoms from getting soggy. But let’s be real – they rarely last that long in my house!
Storing and Reheating Garlic Parmesan Cheeseburger Bombs
Now let’s talk about what to do with leftovers – though honestly, I rarely have any! But on the off chance you’ve made extra (or have willpower I don’t possess), here’s how to keep them tasting just as amazing as when they first came out of the oven.
Fridge storage is your friend: Once completely cooled, tuck those cheesy bombs into an airtight container with a sheet of parchment between layers. They’ll keep beautifully in the fridge for up to 3 days. I learned the hard way that plastic wrap alone lets them dry out – the container makes all the difference!
Freezing for later? Absolutely! These little guys freeze like champs. After baking and cooling, arrange them in a single layer on a baking sheet and pop them in the freezer until solid (about 2 hours). Then transfer to a freezer bag with all the air squeezed out. They’ll keep for up to 2 months this way. Pro tip: write the date on the bag – frozen food amnesia is real!
Reheating magic: The microwave is tempting but will give you sad, soggy bombs. For that just-baked crispness, always reheat in the oven or toaster oven at 350°F for about 10 minutes (15 if frozen). No need to thaw – just add a couple extra minutes. I like to give them a quick brush with fresh melted butter when they come out to revive that garlic-parmesan crust. If you’re in a hurry, an air fryer at 325°F for 5 minutes works wonders too!
One last tip: if you want to get ahead, you can assemble the uncooked bombs and refrigerate them for up to 24 hours before baking. Just add 2-3 minutes to the baking time. It’s my secret when hosting – all the prep is done, and I can pop them in when guests arrive for that fresh-from-the-oven magic!
Garlic Parmesan Cheeseburger Bombs FAQs
Over the years, I’ve gotten so many questions about these addictive little bombs – and I love sharing what I’ve learned through all my kitchen experiments (and yes, a few failed attempts!). Here are the answers to the most common queries:
Can I freeze Garlic Parmesan Cheeseburger Bombs?
Absolutely! They freeze beautifully. For best results, freeze them before baking – just assemble as usual, place on a parchment-lined baking sheet, and freeze until solid (about 2 hours). Then transfer to a freezer bag. When ready to bake, add 5-7 minutes to the cooking time straight from frozen. Already baked leftovers can be frozen too, though they’re best reheated in the oven rather than microwave to maintain texture.
Can I use homemade biscuit dough?
You sure can! I’ve used my favorite homemade biscuit recipe with great success. Just roll it slightly thicker than you would for regular biscuits (about 1/2 inch) so it can hold the filling without tearing. The dough should be cold and firm when working with it. If it gets too warm and sticky, pop it in the fridge for 15 minutes to chill again.
How do I prevent sogginess?
The key is draining that beef really well after cooking – I even pat it with paper towels sometimes. Also, don’t overfill the bombs (about 1 tbsp filling per biscuit is perfect). If your beef mixture seems particularly greasy, you can stir in a tablespoon of breadcrumbs to help absorb excess moisture. And always bake them on an ungreased sheet – the dry heat helps crisp the bottoms.
Can I make these ahead of time?
Yes! Assemble the uncooked bombs up to 24 hours in advance and keep them covered in the fridge. The cold actually helps the dough hold its shape better when baking. Just add 2-3 minutes to the baking time since they’ll be going into the oven cold. For longer storage, freeze them as mentioned above.
What’s the best way to reheat leftovers?
The oven or toaster oven is your best bet for maintaining that crispy exterior. 350°F for about 10 minutes does the trick. If you’re in a hurry, the air fryer works great too – just 3-4 minutes at 325°F. Avoid the microwave unless you don’t mind a softer texture (though they’ll still taste delicious!). A quick brush with fresh melted butter when reheating brings back that garlic-parmesan magic.
Can I make these vegetarian?
Of course! My vegetarian friends love when I substitute the beef with sautéed mushrooms (baby bellas work great) mixed with onions and a bit of Worcestershire sauce (check that it’s vegetarian). You can also use plant-based ground “meat” – just be sure to cook off any excess liquid first so your filling isn’t too wet.
Nutritional Information for Garlic Parmesan Cheeseburger Bombs
Okay, let’s talk numbers – but remember, this is home cooking, not lab science! These estimates are based on my exact ingredients (including that 80/20 beef blend and full-fat cheeses), but your totals might vary slightly depending on brands or tweaks you make. Here’s the breakdown per glorious bomb:
- Calories: 240
- Total Fat: 15g (6g saturated)
- Cholesterol: 40mg
- Sodium: 450mg
- Carbohydrates: 16g
- Fiber: 1g
- Sugar: 2g
- Protein: 12g
A few quick notes: that sodium amount includes the natural salt in the cheeses and the added seasoning – if you’re watching sodium, you can reduce the added salt by half. The carbs come mostly from the biscuit dough, so using a “thin” style biscuit can lower them slightly. And that protein? That’s the beef and cheese teaming up to keep you satisfied!
Remember, these are appetizers meant to be enjoyed in moderation (though I won’t judge if you have three…). Pair them with veggie sticks or a salad to balance things out. Now that you’ve got the facts, go forth and enjoy every cheesy, garlicky bite guilt-free!
Print
“8 Irresistible Garlic Parmesan Cheeseburger Bombs You Must Try”
- Total Time: 30 mins
- Yield: 8 bombs 1x
- Diet: Low Carb
Description
Garlic Parmesan Cheeseburger Bombs are savory, bite-sized snacks packed with ground beef, melted cheese, and garlic parmesan flavors. Perfect for parties or quick appetizers.
Ingredients
- 1 lb ground beef
- 1 tube refrigerated biscuit dough
- 1 cup shredded cheddar cheese
- 1/4 cup grated parmesan cheese
- 1 tsp garlic powder
- 1/2 tsp onion powder
- 1/2 tsp salt
- 1/4 tsp black pepper
- 2 tbsp melted butter
- 1 tbsp chopped parsley (optional)
Instructions
- Preheat oven to 375°F (190°C).
- Cook ground beef in a skillet until browned. Drain excess fat.
- Add garlic powder, onion powder, salt, and pepper to the beef. Mix well.
- Flatten each biscuit dough piece into a small circle.
- Spoon a tablespoon of cooked beef and a sprinkle of cheddar cheese onto each dough circle.
- Fold the dough around the filling and pinch to seal.
- Place bombs seam-side down on a baking sheet.
- Bake for 12-15 minutes or until golden brown.
- Brush with melted butter and sprinkle with parmesan and parsley.
- Serve warm.
Notes
- Use fresh grated parmesan for better flavor.
- Substitute ground turkey for a leaner option.
- Store leftovers in the fridge for up to 3 days.
- Prep Time: 15 mins
- Cook Time: 15 mins
- Category: Appetizer
- Method: Baking
- Cuisine: American
Nutrition
- Serving Size: 1 bomb
- Calories: 240
- Sugar: 2g
- Sodium: 450mg
- Fat: 15g
- Saturated Fat: 6g
- Unsaturated Fat: 7g
- Trans Fat: 0g
- Carbohydrates: 16g
- Fiber: 1g
- Protein: 12g
- Cholesterol: 40mg
Keywords: garlic parmesan cheeseburger bombs, easy appetizers, party snacks, beef recipes