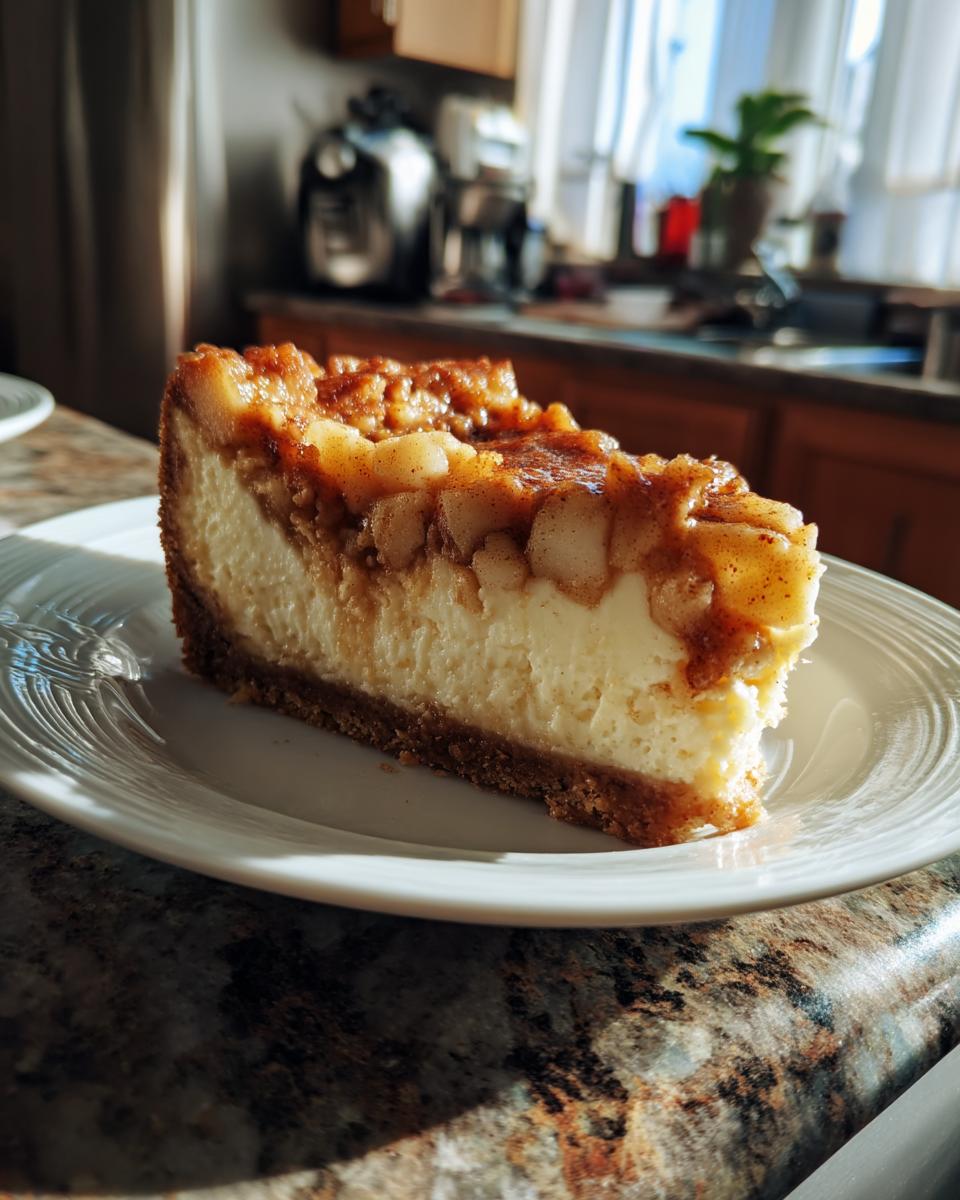
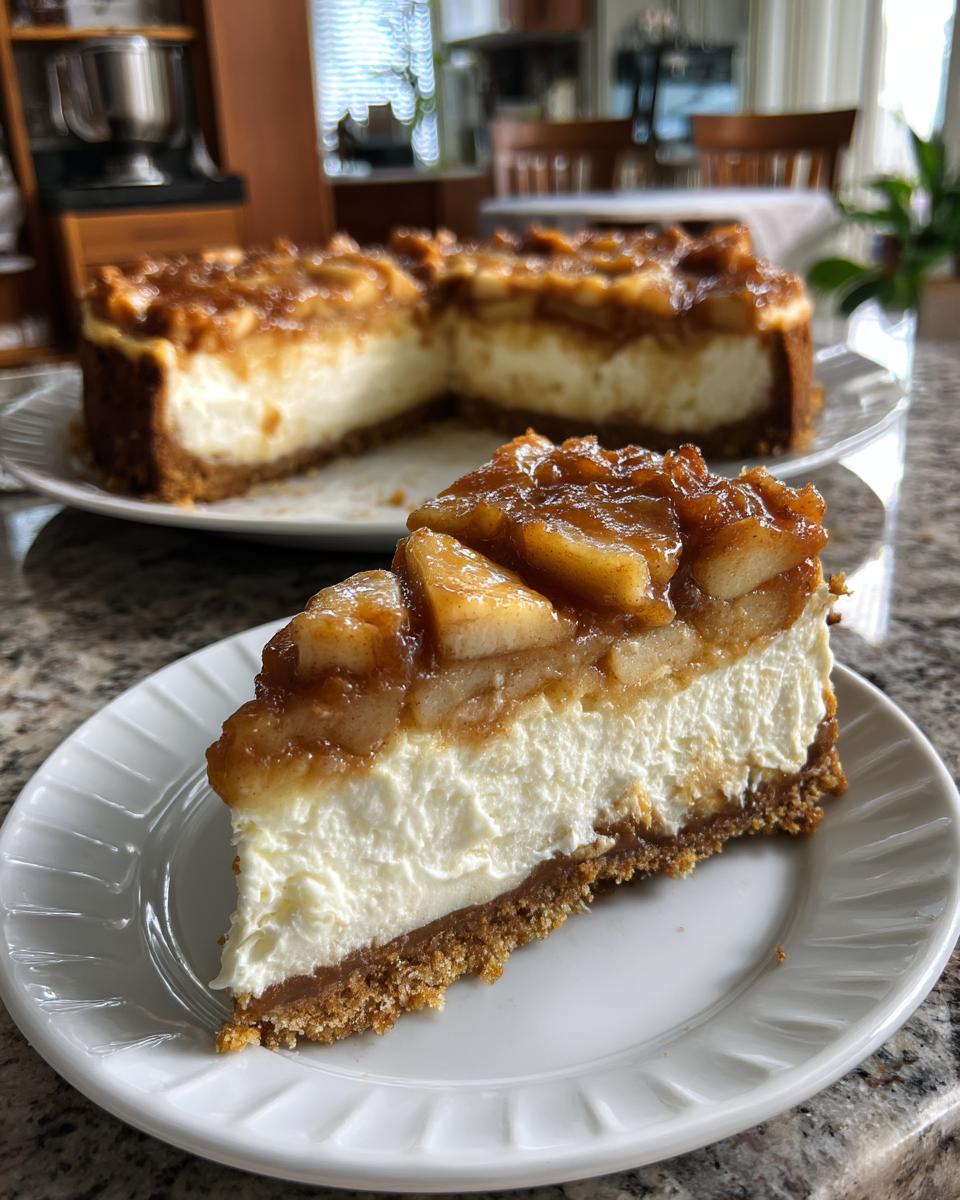
Okay, so picture this: you’re trying to decide between a slice of warm, comforting apple pie and a decadent, creamy cheesecake. Tough choice, right? Well, what if I told you you don’t have to choose? You can have BOTH! Seriously, this Apple Pie Cheesecake is like the ultimate dessert mashup. It takes everything you love about classic apple pie – the spiced apples, the crumbly topping – and layers it onto a rich, smooth cheesecake. It’s pure magic, I tell ya!
The first time I made this Apple Pie Cheesecake, it was for a family potluck, and let me tell you, it disappeared in minutes! People were raving, asking for the recipe, and I just grinned. It looks fancy, but honestly, it’s totally doable for any home baker. The way the sweet, tender apples sink ever so slightly into that creamy cheesecake layer… it’s just divine. And that little crumbly topping? The perfect finish. Trust me, this isn’t just a dessert; it’s an experience!

Why You’ll Love This Apple Pie Cheesecake
Okay, so why *this* Apple Pie Cheesecake, you ask? Because it’s seriously the best of both worlds! It’s not just a cheesecake *with* apples, or an apple pie trying to be creamy. It’s a perfect marriage! Plus, you get major bragging rights without needing a culinary degree. Win-win!
The Perfect Fusion of Apple Pie Cheesecake
This recipe really nails the balance. You get that classic tangy-sweetness from the apples, all warm with cinnamon and nutmeg, but then it melts right into that velvety smooth, rich cheesecake. And that crumbly topping? It gives you that little bit of pie crust texture without all the fuss of a full crust. It’s a flavor party where everyone gets along!
Simple Steps for Apple Pie Cheesecake Success
Don’t let the fancy layers fool you! Making this Apple Pie Cheesecake is totally manageable. The steps are straightforward, and I’ve broken them down so you can follow along easily. No complicated techniques here, just simple mixing and layering for a dessert that looks and tastes incredibly impressive. You got this!
Ingredients for Your Apple Pie Cheesecake
Alright, let’s talk about what you’ll need to get this Apple Pie Cheesecake party started! Nothing too wild or crazy here, just good old-fashioned ingredients that come together to make something truly spectacular. Make sure you’ve got everything ready before you start, it just makes things flow so much smoother!
- 1 and 1/2 cups graham cracker crumbs (about 9 full graham crackers, finely crushed)
- 1/4 cup granulated sugar (for the crust!)
- 1/2 cup unsalted butter, melted (liquid gold for that crust)
- 4 (8 ounce) packages cream cheese, softened (seriously, make sure it’s soft!)
- 1 and 1/2 cups granulated sugar (for the creamy filling)
- 1/4 cup all-purpose flour (just a little to help things set)
- 1 teaspoon ground cinnamon (essential for that apple pie vibe)
- 1/2 teaspoon ground nutmeg (cinnamon’s best friend)
- 1/4 teaspoon ground cloves (a tiny bit goes a long way!)
- 4 large eggs (room temperature is key here!)
- 1 cup sour cream (adds that perfect tang and creaminess)
- 1 teaspoon vanilla extract (always add vanilla!)
- 4 cups thinly sliced peeled apples (about 4 medium apples, whatever kind you like to bake with!)
- 1/2 cup packed light brown sugar (for those yummy apples)
- 1/4 cup all-purpose flour (helps thicken the apple layer)
- 1/4 cup unsalted butter, cut into small pieces (for that delightful crumb topping)
See? Nothing intimidating! Just grab these goodies, and you’re well on your way to Apple Pie Cheesecake heaven!
Step-by-Step: How to Prepare Apple Pie Cheesecake
Okay, deep breaths! Making this Apple Pie Cheesecake is really just about following the steps. We’re building deliciousness layer by layer, and I’ll walk you through it. Don’t rush, enjoy the process, and soon you’ll have a showstopper dessert ready to go!
Preparing the Crust for Apple Pie Cheesecake
First things first, let’s get that yummy base ready! You’ll want to preheat your oven to 350°F (175°C). Grab a small bowl and mix together your graham cracker crumbs, that little bit of granulated sugar for the crust, and your melted butter. It should look like wet sand. Now, take your 9-inch springform pan – those sides come off, which is super helpful for cheesecake! – and press that crumb mixture firmly onto the bottom. Get it nice and even. Pop it in the oven for just 10 minutes. This little bake time helps set the crust so it doesn’t get soggy later. Once it’s done, take it out and let it cool completely while you work on the rest.
Crafting the Creamy Apple Pie Cheesecake Filling
Okay, time for the star of the show – the cheesecake filling! In a big bowl, beat your softened cream cheese and the larger amount of granulated sugar until it’s super smooth and there are no lumps. This is where using room temperature cream cheese really pays off! Next, beat in the 1/4 cup of flour and all those lovely spices: cinnamon, nutmeg, and cloves. Now, add your eggs, but here’s a key tip: add them one at a time and only mix until each egg is *just* combined. Don’t go crazy beating it after the eggs are in, okay? Overmixing at this stage can lead to cracks later, and we don’t want that! Finally, stir in the sour cream and vanilla extract until everything is beautifully smooth and creamy.
Adding the Apple Layer to Your Apple Pie Cheesecake
Now for the apple pie part! In a separate medium bowl, toss your thinly sliced, peeled apples with the brown sugar and the remaining 1/4 cup of flour. Give it a good mix so the apples are nicely coated. Go back to your cooled crust and pour about half of your creamy cheesecake mixture right over it. Smooth it out gently. Then, spoon that delicious apple mixture evenly over the cream cheese layer. Don’t worry if some pieces are bigger than others, it adds character! Finally, carefully pour the remaining cheesecake mixture over the apples, making sure to cover them completely if you can.
Baking and Cooling Your Apple Pie Cheesecake
Almost there! For the topping, quickly combine the remaining 1/4 cup flour and the small pieces of cold butter in a small bowl. Use your fingers or a pastry blender to cut the butter into the flour until it looks like coarse crumbs. Sprinkle this crumbly goodness all over the top of the cheesecake. Now, carefully place your springform pan on a baking sheet (just in case of any drips!) and pop it into your preheated 350°F oven. Bake for about 60-75 minutes. You’ll know it’s done when the edges are set but the center still has a slight wobble to it. Don’t overbake! This is another key to preventing cracks.
Once the baking time is up, turn off the oven but leave the cheesecake inside. Prop the oven door open a little (a wooden spoon works great!) and let it cool in the gradually cooling oven for about an hour. This slow cooling helps prevent that dreaded crack down the middle. After an hour, take it out of the oven and let it cool completely on a wire rack at room temperature. This can take a couple of hours. Once it’s totally cool (seriously, be patient!), cover it loosely and pop it in the fridge for at least 4 hours, but ideally overnight. Chilling is crucial for the cheesecake to firm up properly before slicing. Trust me, the wait is worth it!
Tips for Making the Best Apple Pie Cheesecake
Want to make sure your Apple Pie Cheesecake turns out absolutely perfect? Here are a couple of my go-to tips that make a big difference. They seem simple, but they really help you get that smooth, creamy texture we’re aiming for!
Room Temperature Ingredients for Smooth Apple Pie Cheesecake
Okay, this is a non-negotiable rule for cheesecake in my kitchen! Make sure your cream cheese is fully softened – you should be able to easily poke a finger into it. And your eggs? Let them sit out for at least 30 minutes before you start mixing. Cold ingredients just don’t blend together smoothly, and you’ll end up with lumps. Room temperature ingredients cream together beautifully, giving you that silky smooth batter that bakes up perfectly.
Avoiding Overmixing Your Apple Pie Cheesecake Batter
I know it’s tempting to beat the heck out of cheesecake batter, but resist the urge, especially after you add the eggs! Once those eggs go in, you only want to mix until they are just incorporated. Overmixing develops too much air in the batter, and while that sounds good, it’s a major culprit for cracks on the surface of your cheesecake. So, once the eggs are in, mix on low speed and stop as soon as you don’t see any streaks of egg anymore. Gentle is the name of the game here!
Variations for Your Apple Pie Cheesecake
Okay, so the basic Apple Pie Cheesecake recipe is amazing as is, but sometimes it’s fun to play around a little, right? You can totally customize this to make it your own! Feeling extra decadent? Swirl some caramel sauce into the cheesecake batter just before adding the apples. Or, if you love spice, add a pinch more cinnamon or a tiny bit of ground cardamom to the apple mixture. You could even swap out some of the graham cracker crumbs for gingersnap crumbs for a spicier crust!
Serving Suggestions for Apple Pie Cheesecake
Alright, you’ve made this glorious Apple Pie Cheesecake, you’ve chilled it patiently (mostly!), and now it’s time for the best part: serving it up! Honestly, a slice of this is pretty perfect all on its own. But if you want to take it over the top, a dollop of fresh whipped cream is always a winner. Or, for a truly indulgent treat, a scoop of vanilla bean ice cream melting onto a warm slice? Pure bliss! A drizzle of caramel sauce wouldn’t hurt either, just saying!
Storage and Reheating Your Apple Pie Cheesecake
Okay, if you somehow manage to have leftovers of this Apple Pie Cheesecake (a truly rare feat!), storing it properly is key. Keep the cheesecake covered tightly with plastic wrap or in an airtight container in the refrigerator. It’ll stay delicious for about 3-4 days. As for reheating, honestly, I think this cheesecake is best served chilled or at room temperature! The textures and flavors really shine. If you *really* want a warm slice, you could gently warm a piece in the microwave for a few seconds, but be careful not to overheat it – you don’t want to melt that beautiful creaminess!
Apple Pie Cheesecake FAQs
Got questions about making this amazing Apple Pie Cheesecake? Don’t worry, you’re not alone! Here are some things people often ask, and my best answers to help you out.
Can I Use Canned Apples in My Apple Pie Cheesecake?
Honestly, I really recommend using fresh apples for this Apple Pie Cheesecake. Canned pie filling is already cooked down and sweetened, and it just won’t give you the same fresh texture and flavor as thinly sliced fresh apples that soften as they bake in the cheesecake. Plus, you have more control over the spice level with fresh!
How Do I Prevent Cracks in My Apple Pie Cheesecake?
Ah, the dreaded cheesecake crack! A few things help here. First, make sure your cream cheese and eggs are truly at room temperature. Don’t overmix the batter, especially after adding the eggs – just mix until they’re combined. Baking the cheesecake at the right temperature and *not* overbaking it is also key. And finally, that slow cooling process in the turned-off oven with the door ajar is a lifesaver for preventing sudden temperature changes that cause cracks.
How Long Does Apple Pie Cheesecake Last in the Refrigerator?
Once it’s baked and properly chilled, your Apple Pie Cheesecake will be delicious for about 3 to 4 days when stored tightly covered in the refrigerator. Make sure it’s well-wrapped so it doesn’t pick up any weird fridge smells!
Estimated Nutritional Information
Okay, a quick note about the nutritional stuff for this Apple Pie Cheesecake. While I can tell you all about how yummy it is, giving exact nutrition facts is a little tricky! Things like the specific brands of ingredients you use, how big you slice it (be honest!), and even the type of apples can change the numbers. So, please know that any nutritional values you might see out there are just estimates. If you need precise information for dietary reasons, it’s best to calculate it yourself based on the exact ingredients you use. But hey, sometimes you just need a slice of deliciousness, and this one is worth it!
Enjoy Your Homemade Apple Pie Cheesecake
Okay, so there you have it! My absolute favorite way to combine two classic desserts into one show-stopping Apple Pie Cheesecake. I really hope you give this recipe a try, because it’s just too good not to share! When you make it, I’d LOVE to hear about it. Did your family devour it? What did you think of the texture? Come back and leave a comment below and let me know how it turned out for you! Happy baking!
Print
Awesome 2-in-1 Apple Pie Cheesecake
- Total Time: 5 hours 45 minutes
- Yield: 12 servings 1x
Description
A delightful fusion of classic apple pie and creamy cheesecake.
Ingredients
- 1 and 1/2 cups graham cracker crumbs
- 1/4 cup granulated sugar
- 1/2 cup unsalted butter, melted
- 4 (8 ounce) packages cream cheese, softened
- 1 and 1/2 cups granulated sugar
- 1/4 cup all-purpose flour
- 1 teaspoon ground cinnamon
- 1/2 teaspoon ground nutmeg
- 1/4 teaspoon ground cloves
- 4 large eggs
- 1 cup sour cream
- 1 teaspoon vanilla extract
- 4 cups thinly sliced peeled apples (about 4 medium)
- 1/2 cup packed light brown sugar
- 1/4 cup all-purpose flour
- 1/4 cup unsalted butter, cut into small pieces
Instructions
- Preheat oven to 350°F (175°C).
- In a small bowl, combine graham cracker crumbs, 1/4 cup granulated sugar, and melted butter. Press mixture onto the bottom of a 9-inch springform pan. Bake for 10 minutes. Let cool.
- In a large bowl, beat cream cheese and 1 and 1/2 cups granulated sugar until smooth.
- Beat in 1/4 cup flour, cinnamon, nutmeg, and cloves.
- Beat in eggs one at a time, mixing just until combined.
- Stir in sour cream and vanilla extract.
- Pour half of the cream cheese mixture over the crust.
- In a medium bowl, combine sliced apples, brown sugar, and 1/4 cup flour.
- Spoon apple mixture over the cream cheese layer.
- Pour remaining cream cheese mixture over the apples.
- In a small bowl, combine remaining 1/4 cup flour and cut-in butter until crumbly. Sprinkle over the top of the cheesecake.
- Bake for 60-75 minutes, or until the center is set.
- Turn off oven and let cheesecake cool in the oven with the door ajar for 1 hour.
- Remove from oven and cool completely on a wire rack.
- Refrigerate for at least 4 hours before serving.
Notes
- For best results, use room temperature cream cheese and eggs.
- Do not overmix the batter once the eggs are added.
- Cooling the cheesecake gradually helps prevent cracks.
- Prep Time: 30 minutes
- Cook Time: 75 minutes
- Category: Dessert
- Method: Baking
- Cuisine: American
Nutrition
- Serving Size: 1 slice
Keywords: apple pie, cheesecake, dessert, baking