Oh my goodness, I have to tell you about my latest weeknight savior! If you are anything like me, after a long day, the thought of making a glorious dessert is amazing, but the mountain of sticky dishes afterward? Not so amazing. Well, pause right there! I figured out how to get all that warm, gooey fruit goodness without the fuss. Hello to the Sheet Pan Maple Roasted Pear Crisp, my new best friend. Seriously, this entire dessert bakes up on one single baking sheet. It’s fast, it smells like heaven with the maple syrup caramelizing, and cleanup usually only takes about thirty seconds. You are going to absolutely love this simple solution for a quick, sweet ending!

Why This Sheet Pan Maple Roasted Pear Crisp is Your New Favorite Dessert
I’m telling you, this dessert is a game-changer for busy evenings. When I look at the list of reasons to love this Sheet Pan Maple Roasted Pear Crisp, I get excited all over again. It just ticks every box for a stress-free treat!
- It’s unbelievably fast—prep takes almost no time at all.
- The flavor is pure autumn comfort without being heavy.
- And the cleanup? Oh, the cleanup is the best part!
It proves you don’t need a fancy springform pan or multiple mixing bowls to make something amazing. I even linked some other easy recipes you might want to check out while you’re thinking about simple baking over here: easy roll-ups and pinwheels.
Minimal Cleanup with Sheet Pan Maple Roasted Pear Crisp
This is where the magic really happens! Because everything bakes right on that sheet pan, all you’re really cleaning is the parchment paper afterwards. I mean, you line it first, right? Peel the pears, mix the topping, spread it out, and bake. When it’s gorgeous and bubbly, you just lift out the paper and toss it! It really is that simple. The fewer dishes I have waiting for me, the faster I’m ready to curl up with dessert, trust me.
Perfectly Roasted Fruit Texture
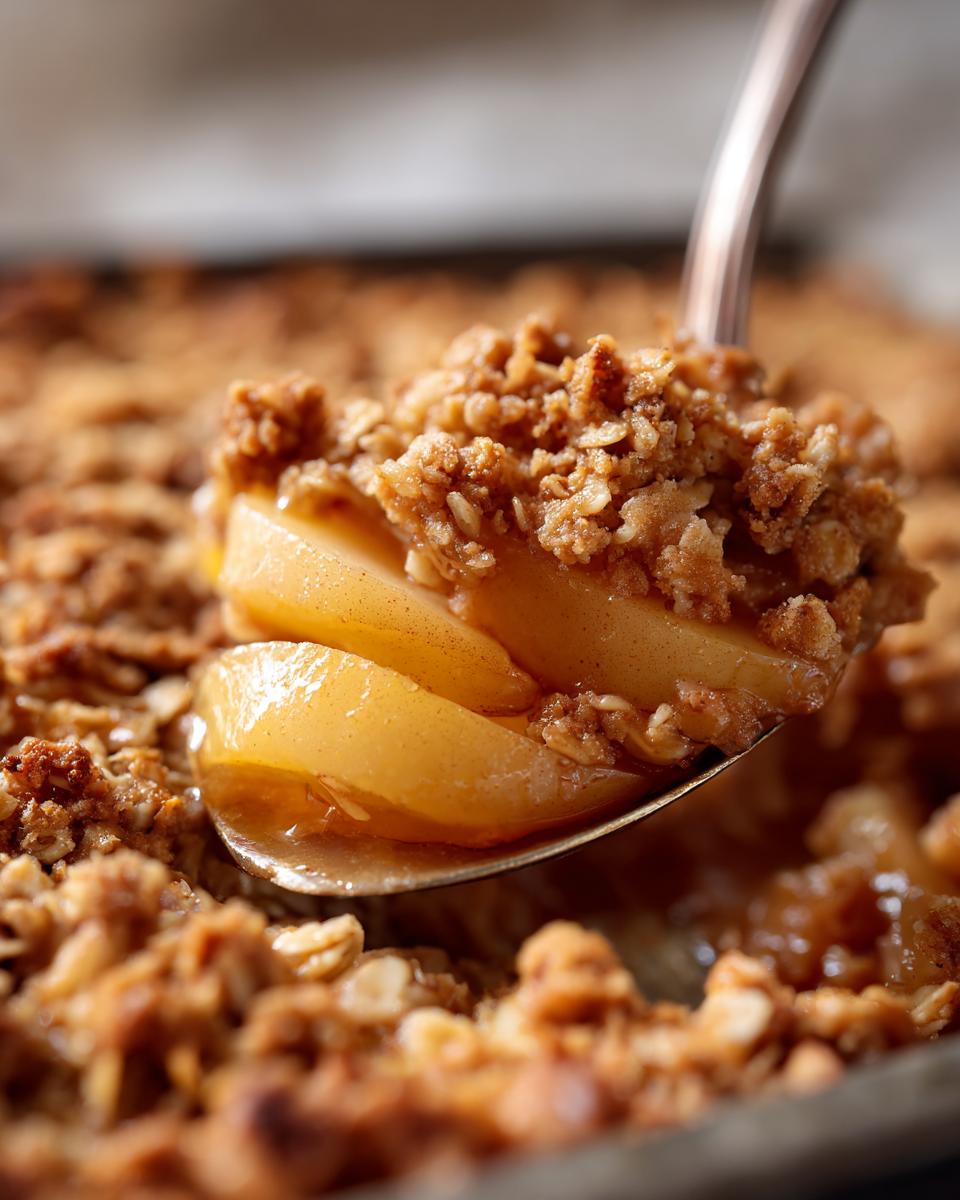
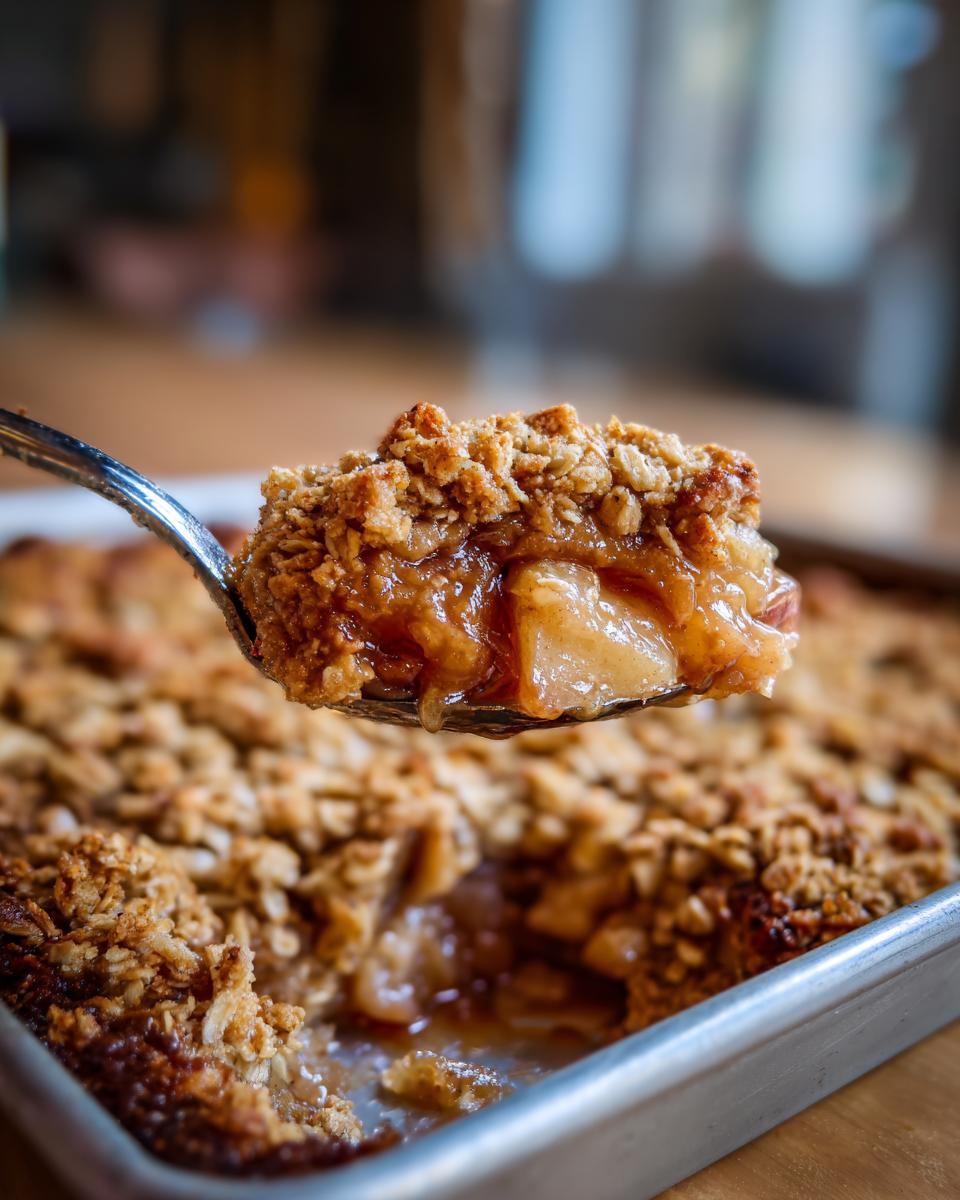
When we talk about roasted fruit, we aren’t talking about mushy fruit! The high heat caramelizes the edges of those pears, making them intensely sweet, but since we toss them with lemon juice first, they keep just enough structure. They become wonderfully tender—soft enough to scoop up easily with a fork—but they haven’t completely melted away. That combination with the crunchy, buttery oat crumble on top? Heaven!
Gathering Ingredients for Your Sheet Pan Maple Roasted Pear Crisp
The ingredient list here is super short, which is part of why this recipe travels everywhere with me when I need something fast. Everything we need is generally already hanging out in my pantry or fruit bowl, which is just perfect. Don’t feel locked into pears, either! If you have some slightly firm apples on hand, you can absolutely swap them out for the pears in this Sheet Pan Maple Roasted Pear Crisp. If you’re looking for more delicious autumn flavors, I actually have a fun recipe for apple cider caramels you might want to bookmark for later.
For the Maple Roasted Pears
For the fruit base, we only need three things, but the quality matters a bit here. You’ll need about four ripe pears. Remember, ripe means slightly soft to the squeeze, but not mushy—we want them to hold up to the heat! Then we use 2 tablespoons worth of the good stuff, maple syrup, and just a splash of lemon juice to keep everything bright and stop those cut pears from turning brown too quickly.
For the Oat Crumble Topping
This is where we build the texture! For the crumb, grab 1/2 cup of all-purpose flour, 1/2 cup of good old rolled oats, 1/4 cup of brown sugar (packed firmly), and just a kiss of cinnamon—about 1/4 teaspoon. The absolute most important part is the butter. You need 1/4 cup of cold, unsalted butter, and you have to cut it into little pea-sized pieces. Keep that butter cold, or it won’t get that crumbly, sandy texture we are looking for in our Sheet Pan Maple Roasted Pear Crisp topping!
Step-by-Step Instructions for Sheet Pan Maple Roasted Pear Crisp
Okay, let’s get baking! You are going to be shocked at how few steps this takes, especially when you remember that you don’t have to wash a casserole dish later. It’s really designed for speed! If you’re looking for other quick ideas using oats, I highly recommend checking out my quick oat bread recipe, too. But first, let’s get these pears roasted!
Preparing the Pears for the Sheet Pan Maple Roasted Pear Crisp
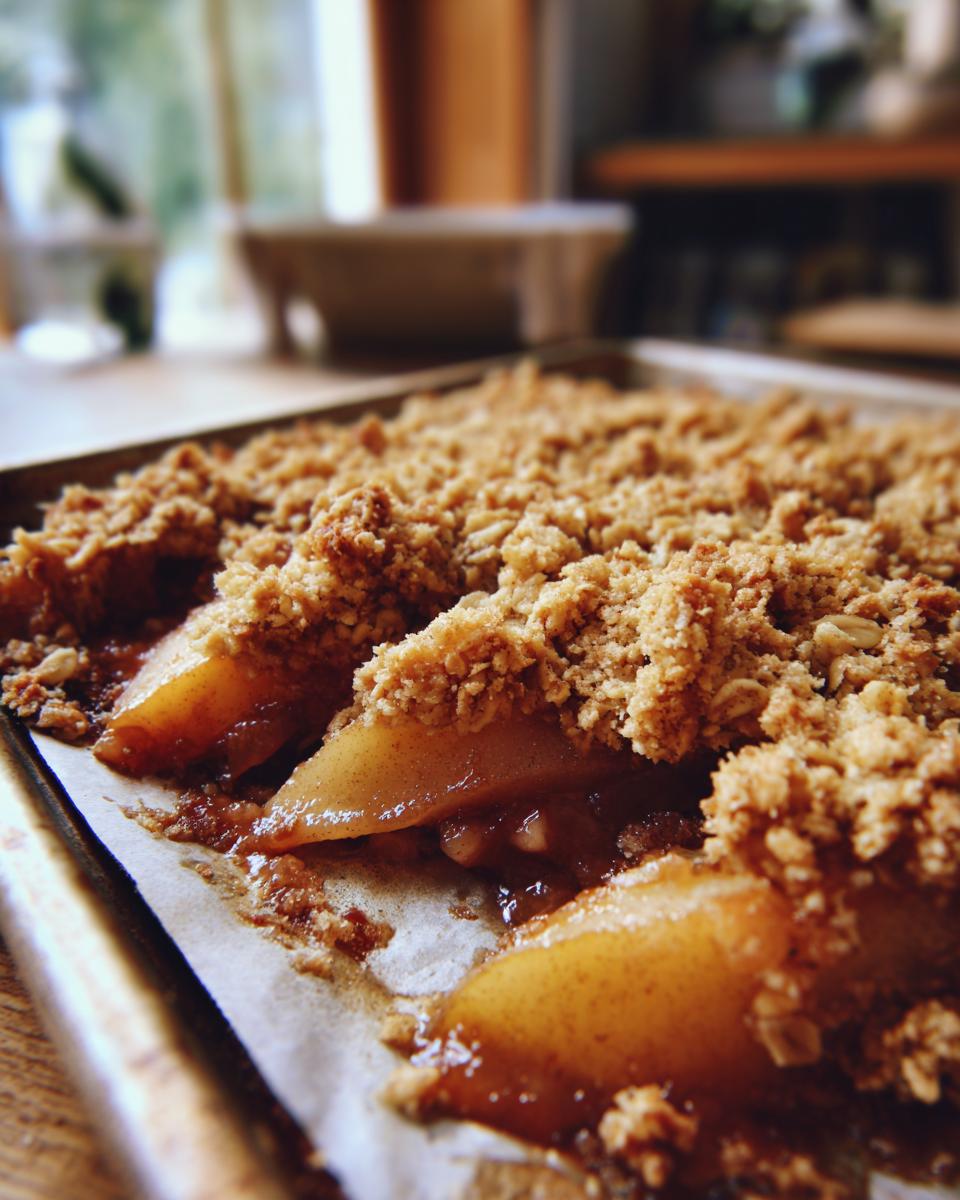
First things first, preheat your oven to 375 degrees Fahrenheit (or 190 Celsius). You absolutely need to line a large baking sheet with parchment paper—this is key for our zero-fuss cleanup in the Sheet Pan Maple Roasted Pear Crisp! Now, take those four pears. Peel them, take out the cores, and slice them up nice and even, about half an inch thick. Toss those slices straight into a bowl with your maple syrup and that little bit of lemon juice. Then, spread the coated pears out onto your prepared sheet pan. Make absolutely sure they are in a single layer. If they’re piled up, they’ll steam instead of roast!
Creating the Perfect Oat Crumble
While the pears are chilling on the pan, quickly mix up the topping in a separate bowl. Combine the flour, rolled oats, brown sugar, and cinnamon. Now, for the technique: take your very cold butter chunks and use a pastry blender—or honestly, just use your fingertips like I always do—and cut that butter right into the dry mix. You’re looking for coarse crumbs, kind of like gravel or cornmeal. Don’t overwork it! If you mash it too much, the butter melts, and you end up with a dense crust instead of a light crisp.
Baking and Finishing the Sheet Pan Maple Roasted Pear Crisp
Once your crumble is ready, sprinkle it evenly over those maple pears on the sheet pan. I always take a moment here to gently press down just slightly on the topping to make sure every pear bit is covered—a little tip for an even bake! Pop the whole tray into the 375-degree oven and let it go for about 25 to 30 minutes. You’ll know it’s done when the topping looks gorgeously golden brown and you can easily pierce a pear slice with a fork. Wow, the smell alone is worth it! Let it cool on the pan for just a few minutes before you dive in.
Tips for the Best Sheet Pan Maple Roasted Pear Crisp
You know I want your Sheet Pan Maple Roasted Pear Crisp to turn out absolutely perfect, not just decent! A few little tricks I’ve picked up over the years really elevate this simple bake from good to spectacular. And if you like the idea of roasting fruit with sweet flavorings, you simply must try my recipe for honey roasted carrots!
Selecting Ripe Pears for Sheet Pan Maple Roasted Pear Crisp
You need to avoid those rock-hard pears that haven’t ripened yet because they just won’t soften the way we want them to during the bake. On the flip side, if they are way too soft, they’ll just turn to soup in the pan. Give the pear a gentle squeeze near the stem—if it gives just a tiny bit, that’s the sweet spot for our roasted fruit! Firm but yielding is what we are aiming for in this Sheet Pan Maple Roasted Pear Crisp.
Preventing a Soggy Crumble
Nobody likes a soggy oat topping, right? That’s why those little pieces of butter need to be ice cold when you cut them in. If you feel like your kitchen is super warm or you’re taking your time mixing the crumble, just pop the bowl of oat topping into the freezer for about five minutes before you sprinkle it over the pears. That chilling pause solidifies the butter again, which keeps it crumbly on top instead of melting into the fruit juices below!
Making Variations on the Sheet Pan Maple Roasted Pear Crisp
The beauty of this base recipe is how easily you can shake things up depending on what you have! If you’re feeling extra adventurous, try swapping out just a tiny bit of that cinnamon for a pinch of cardamom or nutmeg in your oat crumble. It warms up the flavor profile perfectly! And I already mentioned apples, but you could easily make this a mixed fruit fantastic by adding some tart blackberries—check out my recipe for blackberry cobbler for pairing inspiration!
If you prefer a nuttier crunch in your crumble, throw in about 1/4 cup of chopped pecans or walnuts along with your oats. Just make sure everything gets mixed in evenly before you sprinkle it over those gorgeous maple pears. It really makes every bite feel unique!
Serving Suggestions for Your Sheet Pan Maple Roasted Pear Crisp
Now that we’ve successfully navigated the baking process without creating a sink full of dishes, the best part is figuring out how to eat this masterpiece! This Sheet Pan Maple Roasted Pear Crisp is divine when served warm, right out of the oven—but honestly, I rarely wait long enough for it to cool completely.
The absolute classic presentation, and the way my family demands it, is topped with a generous scoop of really good vanilla bean ice cream. The cold, creamy melt mixing with that warm maple syrup and juicy pear is just an unbeatable temperature contrast. If you are serving a crowd, a bowl of fresh whipped cream is fantastic too, especially if you use a hand mixer to whip it up while the crisp is baking!
If you happen to have some homemade cream on hand, even better! If you need a quick fix for a creamy topping, check out my notes on making easy homemade coffee creamer—you can definitely use that technique to whip up a quick batch of simple sweet cream to dollop on top. Either way, make sure you get a good scoop of that crunchy oat crumble in every serving!
Storage and Reheating the Sheet Pan Maple Roasted Pear Crisp
Even though this Sheet Pan Maple Roasted Pear Crisp is almost always gone by the time dinner ends at my house, sometimes we get lucky and have leftovers! If you managed to keep any of this deliciousness hidden away, you’ll want to store it properly so that oat topping doesn’t get sad and soggy overnight. Moisture is the enemy of crispness, you know?
For best results, you need to keep the baked crisp in an airtight container at room temperature for maybe a day, but I highly recommend moving it into the refrigerator after that if you think you’ll keep it longer than 24 hours. I aim to eat it all within three days max. Any longer, and the fruit—even when roasted—just starts to break down too much.
Waking Up That Crisp Topping
Here’s the crucial tip: never, ever try to reheat this in the microwave. Seriously, don’t do it! The microwave will guarantee you end up with a warm, gummy, steamy mess where the lovely oat crumble used to be for your Sheet Pan Maple Roasted Pear Crisp. That just won’t do when you’re craving that contrast!
The absolute best way to revive it is by using an oven or a toaster oven. Preheat your toaster oven to about 350 degrees Fahrenheit. You only need about 5 to 8 minutes, just long enough to warm the pears through and get the butter in that topping to re-crisp itself. It will taste almost exactly like you just pulled the whole pan out!
If you reheat a larger portion, you might need to use your standard oven at the same temperature, but keep an eye on it since it’s already cooked! Enjoy that second batch—you earned it!
Frequently Asked Questions About Sheet Pan Maple Roasted Pear Crisp
I know you probably have questions—you should! When you find a recipe this easy, you want to make sure you nail every step. I’ve gathered the ones I hear most often about making the perfect Sheet Pan Maple Roasted Pear Crisp. Having the right technique ensures that beautiful, tender roasted fruit comes out perfect every time.
Also, if serving this has you thinking about making your own toppings, remember you can find great tips over here on how to make heavy cream at home, which is amazing dolloped on top!
Can I make the Sheet Pan Maple Roasted Pear Crisp ahead of time?
You totally can prep parts ahead, which is great for hosting! I wouldn’t bake the whole thing early, though, because the crisp topping gets soft fast. I highly recommend peeling and slicing your pears, tossing them in the maple syrup mixture, and keeping them covered in the fridge for up to a day. Then, make the oat crumble topping, but keep that totally separate and chilled, too! Assemble and bake everything right before you plan to serve it so you get that amazing fresh crunch on the oat crumble.
What is the best type of pear for this roasted fruit dessert?
For this specific roasted fruit dessert, you want a pear that softens nicely but doesn’t turn completely to liquid when baked. Honestly, Bosc or Anjou pears are my go-to picks. They have a slightly firmer flesh than, say, a Bartlett, which means they hold their shape beautifully in the oven while still becoming tender. If you use Bartletts, just watch the baking time closely, okay?
Can I prepare this recipe using apples instead of pears?
Yes, absolutely! The recipe notes mention it, but I want to emphasize how great this is. If you use apples, you might need to bake it for just 3 to 5 minutes longer, depending on how firm the apple slices are. Granny Smiths are tart and delicious, but firmer apples like Honeycrisp or Fuji work wonderfully with the maple and cinnamon in that oat crumble!
What kind of maple syrup should I use?
Use the real stuff—pure maple syrup! Don’t grab the pancake syrup filled with corn syrup, please. You want the pure, Grade A or Grade B maple syrup that actually comes from a tree. The flavor is so much deeper, and it caramelizes much better on the pears!
Estimated Nutritional Overview
I always try to keep a rough idea of what’s going into what I’m eating, even when it’s a treat like this amazing Sheet Pan Maple Roasted Pear Crisp! Now, you have to remember that this chart I put together is just an estimate, you know? I used standard calculations based on the exact amounts in the recipe, but if you use freakishly giant pears or a different brand of butter, it might shift a smidge.
But for the most part, this gives us a good ballpark idea of what we are diving into when indulging in this wonderful roasted fruit and oat combination. If you’re trying to keep track of your intake, I actually put together some handy tips on how to make sure you’re staying hydrated during the day, too! You can check those out here: how to drink 8 glasses of water each day.
Here’s the breakdown per serving for one slice of that glorious crisp:
- Calories: About 320 per serving! Not bad at all for a warm dessert.
- Fat: Roughly 14 grams, with about 8 grams of that being saturated fat from the lovely butter in that crisp topping.
- Carbohydrates: You’re looking at around 48 grams, which includes all that wonderful natural sugar from the pears and maple.
- Protein: A modest 4 grams, coming from the oats and flour.
- Sugar: About 28 grams, but remember, a lot of that is naturally occurring from the sweet roasted fruit!
- Fiber: We clock in at about 5 grams of fiber, thanks to those oats and the pear skins we left on some slices!
See? It still feels like a perfect indulgence without totally wiping out your day’s allowance. Enjoy every single bite!
Share Your Sheet Pan Maple Roasted Pear Crisp Success
Alright friends, now that you have the secret to making the best Sheet Pan Maple Roasted Pear Crisp with zero dish drama, I really, really want to hear all about it! Seriously, seeing you make my favorite simple desserts is the best part of my kitchen adventures.
Did the maple smell amazing while it was baking? Did you stick to the pears, or did you try an apple swap? Tell me everything! When you get a chance, please leave a rating right down below—a full 5 stars if you loved this easy weeknight winner.
Dropping a comment tells me you tried it out, and that helps other bakers feel confident enough to jump into the sheet pan life, too. I read every single comment, and I love seeing your pictures or hearing what little tweaks you made to your oat crumble. Happy baking, and enjoy every single warm, crispy bite!
Print
Sheet Pan Maple Roasted Pear Crisp
- Total Time: 45 min
- Yield: 4 servings 1x
- Diet: Vegetarian
Description
A simple dessert featuring roasted pears topped with a crisp oat crumble, cooked on a single sheet pan.
Ingredients
- 4 ripe pears
- 2 tablespoons maple syrup
- 1 tablespoon lemon juice
- 1/2 cup all-purpose flour
- 1/2 cup rolled oats
- 1/4 cup packed brown sugar
- 1/4 teaspoon ground cinnamon
- 1/4 cup cold unsalted butter, cut into small pieces
Instructions
- Preheat your oven to 375 degrees Fahrenheit (190 degrees Celsius). Line a large baking sheet with parchment paper.
- Peel, core, and slice the pears into half-inch thick pieces.
- In a bowl, toss the pear slices with maple syrup and lemon juice. Spread the coated pears in a single layer on the prepared baking sheet.
- In a separate bowl, combine the flour, rolled oats, brown sugar, and cinnamon.
- Cut in the cold butter using a pastry blender or your fingers until the mixture resembles coarse crumbs.
- Sprinkle the oat mixture evenly over the pears on the baking sheet.
- Bake for 25 to 30 minutes, or until the topping is golden brown and the pears are tender.
- Let cool slightly before serving.
Notes
- You can substitute apples for pears if desired.
- Serve warm with a scoop of vanilla ice cream or whipped cream.
- Prep Time: 15 min
- Cook Time: 30 min
- Category: Dessert
- Method: Baking
- Cuisine: American
Nutrition
- Serving Size: 1 serving
- Calories: 320
- Sugar: 28
- Sodium: 15
- Fat: 14
- Saturated Fat: 8
- Unsaturated Fat: 6
- Trans Fat: 0
- Carbohydrates: 48
- Fiber: 5
- Protein: 4
- Cholesterol: 30
Keywords: pear crisp, maple, roasted fruit, sheet pan dessert, oat crumble